
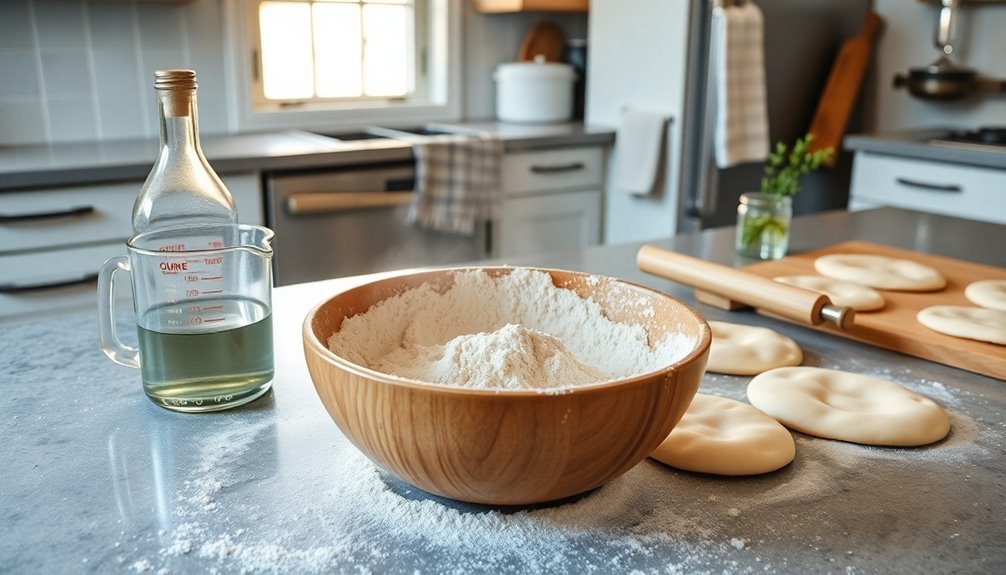
Making homemade pita bread is easier than you think! Start with 2 cups all-purpose flour and 1 cup whole wheat flour, plus 1 ½ teaspoons salt, 1 tablespoon sugar, and 1 tablespoon active dry yeast mixed in 1 ¼ cups warm water. Combine the ingredients, knead the dough until it's smooth, and let it rise for about 1-1.5 hours. Shape the dough, rolling it into discs, then bake them in a preheated oven at 475°F for 5-7 minutes. You'll enjoy warm, fluffy pockets perfect for your favorite fillings. There's even more to explore about enhancing your pita experience!
Key Takeaways
- Combine 2 cups all-purpose flour, 1 cup whole wheat flour, 1 ½ teaspoons salt, and 1 tablespoon sugar in a mixing bowl.
- Activate 1 tablespoon active dry yeast in 1 ¼ cups warm water (110°F) until frothy before mixing with dry ingredients.
- Knead the dough for 8-10 minutes until smooth and elastic, then let it rise in a warm place for 1-1.5 hours.
- Preheat the oven to 475°F (245°C) and bake rolled-out discs for 5-7 minutes until puffed and lightly golden.
- Store cooled pita bread in a clean kitchen towel or airtight container to maintain freshness.
History

Pita bread has a rich history that dates back thousands of years, originating in the Middle East and Mediterranean regions.
You'll find evidence of its existence in ancient texts and archaeological sites, highlighting its significance in various cultures. Traditionally, people baked pita in clay ovens, allowing it to puff up and create that signature pocket.
This unique feature made it perfect for holding meats, vegetables, and dips, which is something you're likely to enjoy today. As trade routes expanded, pita spread to different countries, each adding their twist to the bread.
Over time, it became a staple food, symbolizing communal dining and sharing, which you can appreciate in gatherings around the table.
Recipe
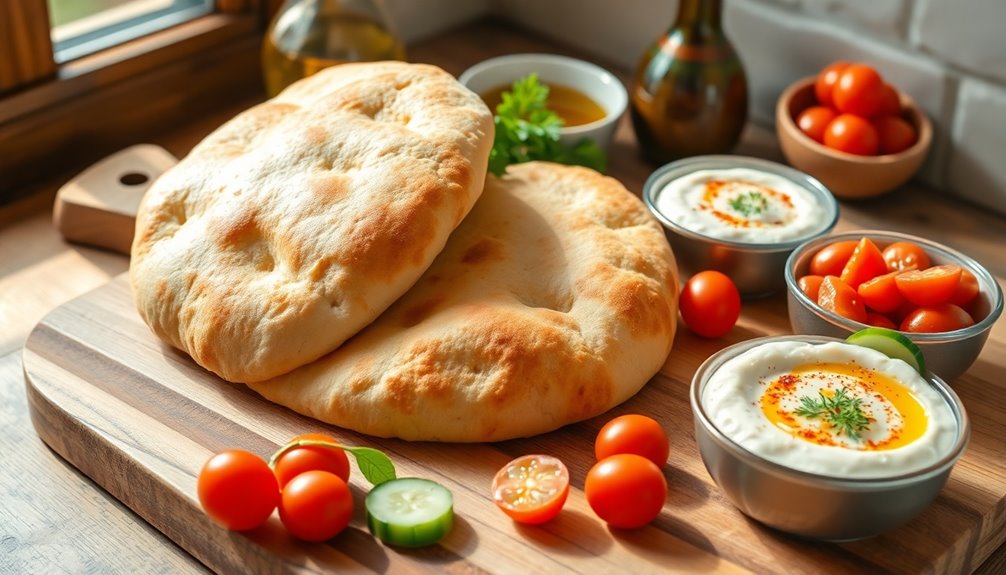
Pita bread is a delicious Middle Eastern staple that can be enjoyed in a variety of ways, from being used as a pocket for fillings to serving as a side for dips like hummus or tzatziki. This versatile bread is known for its signature puffed-up appearance, which occurs when the dough is baked at high temperatures, creating a pocket that can be filled with your favorite ingredients.
Making pita bread from scratch isn't only rewarding but also allows you to enjoy the warm, fresh flavors that store-bought versions often lack. The process of making pita bread is relatively simple and requires only a few basic ingredients. With a little patience and the proper technique, you can master the art of pita-making in no time.
Whether you're planning to serve it at a gathering or simply want to enjoy it with a homemade meal, this recipe will guide you through each step to guarantee your pitas turn out perfectly every time.
Ingredients:
- 2 cups all-purpose flour
- 1 cup whole wheat flour
- 1 ½ teaspoons salt
- 1 tablespoon sugar
- 1 tablespoon active dry yeast
- 1 ¼ cups warm water (110°F)
- 2 tablespoons olive oil
Instructions:
In a large mixing bowl, combine the all-purpose flour, whole wheat flour, salt, sugar, and active dry yeast. Gradually add the warm water and olive oil, mixing until a dough forms.
Knead the dough on a floured surface for about 8-10 minutes until it becomes smooth and elastic. Place the dough in a greased bowl, cover it with a damp cloth, and allow it to rise in a warm place for about 1 hour, or until it has doubled in size.
Preheat your oven to 475°F (245°C) and place a baking stone or an inverted baking sheet inside to heat up. Once the dough has risen, punch it down and divide it into 8 equal pieces. Roll each piece into a ball and then flatten them into discs about ¼ inch thick.
Bake the discs on the preheated stone or sheet for about 5-7 minutes, or until they puff up and are lightly golden.
Extra Tips:
For best results, confirm your water is at the right temperature (around 110°F) to activate the yeast without killing it. If your pitas aren't puffing up properly, try adjusting the oven temperature or baking time.
Additionally, you can experiment with adding herbs or spices to the dough for extra flavor. To store your pita bread, let it cool completely and then wrap it in a clean kitchen towel or place it in an airtight container to keep it soft and fresh.
Cooking Steps

To make your pita bread, start by measuring warm water accurately.
Next, combine the yeast and sugar mixture before kneading the dough until it's smooth.
After that, you'll let the dough rise covered before shaping it into balls.
Step 1. Measure Warm Water Precisely

Measuring warm water precisely is essential for achieving the perfect pita bread texture. Too hot, and you risk killing the yeast; too cold, and it won't activate properly.
Use a kitchen thermometer to check the temperature, aiming for around 110°F (43°C). If you don't have a thermometer, you can test it with your wrist—warm to the touch but not hot.
Pour the measured water into a mixing bowl, guaranteeing you have the correct amount before adding other ingredients. Remember, accurate measurements contribute to consistent results.
If you're using a scale, convert cups to milliliters to guarantee precision. Taking this small step can make a big difference in the final product, so don't skip it!
Step 2. Add Yeast and Sugar Mixture

Once you've measured the warm water, it's time to add the yeast and sugar mixture.
Sprinkle the yeast evenly over the warm water, ensuring it's well distributed. Then, add the sugar; this will help activate the yeast.
Let the mixture sit for about 5 to 10 minutes until it becomes frothy. This frothiness indicates that the yeast is alive and ready to work its magic in your dough.
Remember, if you don't see any bubbles or foam, the yeast might be inactive, so it's best to start over with fresh ingredients.
Once your mixture is bubbly, you’re ready to proceed to the next step in creating that delicious pita bread. Enjoy the process! As you knead the dough, let your mind wander to the pina colada preparation steps you learned during your last tropical getaway. Just like mixing the perfect drink, the key to great pita is ensuring all ingredients are well combined and given the right amount of time to rise. Happy baking!
Step 3. Knead Dough Until Smooth
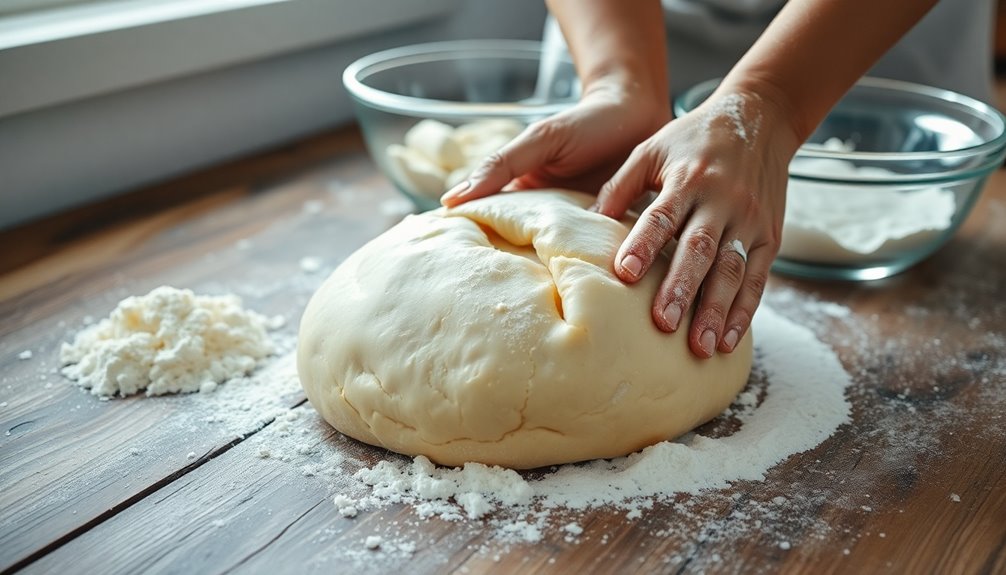
Now it's time to knead the dough until it's smooth and elastic.
Start by dusting your work surface with a little flour to prevent sticking. Turn the dough out onto the surface and use your hands to press it down.
Fold the dough over itself, then push it away with the heel of your hand. Rotate the dough a quarter turn and repeat. Keep kneading for about 8 to 10 minutes.
You'll know it's ready when the dough springs back when you poke it, and it feels soft and pliable. If it's too sticky, sprinkle in a bit more flour, but be careful not to add too much.
Once you achieve that smooth texture, you're ready for the next steps!
Step 4. Let Dough Rise Covered

After achieving that smooth, elastic dough, it's time to let it rise.
First, you'll want to place the dough in a large bowl, ensuring it's lightly greased to prevent sticking. Cover the bowl with a clean kitchen towel or plastic wrap to maintain warmth and moisture.
Find a warm spot in your kitchen—like near a sunny window or on top of the refrigerator—where the dough can rise undisturbed. Let it rest for about 1 to 1.5 hours, or until it doubles in size.
The rising time may vary depending on the temperature in your kitchen, so keep an eye on it. Once it's puffed up nicely, you're ready for the next step in creating your delicious pita bread!
Step 5. Shape Dough Into Balls
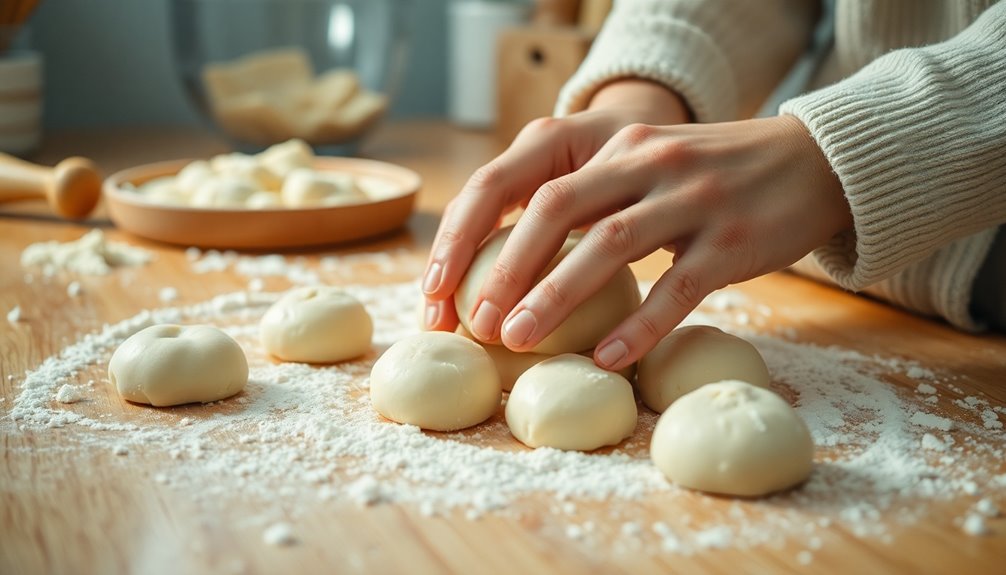
As you prepare to shape the risen dough into balls, make sure your work surface is lightly floured to prevent sticking.
Start by gently punching down the dough to release any air bubbles. Divide the dough into equal pieces, about the size of a golf ball. Roll each piece between your palms to form smooth balls. If the dough feels sticky, sprinkle a little more flour on your hands or the surface.
Once you've shaped all the balls, place them on a lightly floured tray, spacing them slightly apart. Cover the tray with a clean kitchen towel and let them rest for about 30 minutes. This resting period helps the dough relax, making it easier to roll out later.
Final Thoughts

While making pita bread might seem challenging at first, you'll find that the process is both rewarding and enjoyable. Once you've mastered the technique, you'll be able to whip up fresh pita any time you crave it.
Enjoy experimenting with different flours or add herbs for a unique twist. Remember, practice makes perfect—don't be discouraged by initial attempts.
Your homemade pita will impress friends and family, bringing warmth and flavor to any meal. Plus, it's a fantastic way to bond with loved ones in the kitchen.
So roll up your sleeves and jump in! With each batch, you'll gain confidence and discover new ways to enjoy this versatile bread.
Happy baking, and enjoy every bite of your delicious creations!
Frequently Asked Questions
Can I Use Whole Wheat Flour for Pita Bread?
Absolutely, you can use whole wheat flour for your pita bread!
It'll give your bread a nuttier flavor and a denser texture compared to white flour. Just keep in mind that whole wheat flour absorbs more water, so you might need to adjust the liquid in your recipe.
Mixing it with some all-purpose flour can also help achieve a lighter result if you prefer.
Enjoy experimenting with it!
How Long Does Pita Bread Last When Stored?
When you store pita bread properly, it lasts about 3 to 5 days at room temperature.
If you want it to last longer, consider freezing it, which can keep it fresh for up to 3 months.
Just make sure to wrap it tightly in plastic wrap or aluminum foil to prevent freezer burn.
When you're ready to enjoy it again, thaw it at room temperature or reheat it in the oven for the best taste.
Can I Freeze Pita Bread?
Yes, you can freeze pita bread!
Just make sure to wrap it tightly in plastic wrap or aluminum foil to prevent freezer burn. You can also place it in an airtight container or a resealable freezer bag for extra protection.
When you're ready to enjoy it, simply thaw it in the fridge or at room temperature. If you want, you can warm it up in the oven or on a skillet for that fresh taste!
What Is the Best Way to Reheat Pita Bread?
To reheat pita bread, you've got a few great options.
You can wrap it in aluminum foil and pop it in a preheated oven at 350°F for about 10 minutes.
If you're short on time, using a microwave works too; just place it between damp paper towels and heat for 15-30 seconds.
For a crispy texture, try a skillet over medium heat for a minute on each side.
Enjoy that warm, fluffy goodness!
Are There Gluten-Free Alternatives for Pita Bread?
Yes, there are gluten-free alternatives for pita bread!
You can try using gluten-free flatbreads made from almond flour or coconut flour. Cauliflower wraps are another great option, providing a low-carb and gluten-free choice.
If you're looking for something more traditional, some brands offer gluten-free pita bread made from rice flour or a mix of gluten-free grains.
Just check the labels to guarantee they meet your dietary needs. Enjoy experimenting with these alternatives!

Arf, an author and an innovative enthusiast of coffee, coffee alternatives, and tea, plays a crucial role as a contributor to the esteemed Cappuccino Oracle platform. Renowned for his curiosity and passion for these captivating beverages, Arf has carved out a unique space for himself in the world of exploration and writing. He realized that coffee, coffee alternatives, and tea are not mere drinks to keep one awake, but universes of flavors and stories waiting to be explored.