Banana pudding has a rich history that reflects the culinary traditions of the South, making it more than just a dessert—it's a cultural icon. When you gather the ingredients and start crafting this layered delight, you'll find that the combination of textures and flavors is surprisingly simple yet satisfying. There's a certain finesse to achieving the perfect balance between creamy and crunchy that can elevate your dessert game. Curious about how to master this classic dish and perhaps add your own twist?
Key Takeaways
- Combine 1 package of instant vanilla pudding mix with 2 cups of milk until smooth, then fold in sweetened condensed milk and thawed whipped topping.
- Layer the mixture with sliced ripe bananas and vanilla wafers in a serving dish, repeating until all ingredients are used.
- For optimal flavor, refrigerate the assembled pudding for at least 1 hour before serving, ideally 4 hours.
- Reserve some vanilla wafers to sprinkle on top for added crunch and decoration.
- Enjoy the creamy texture and delightful contrast of flavors that make banana pudding a beloved classic.
Top picks for "banana pudd recipe"
Open Amazon search results for this keyword.
As an affiliate, we earn on qualifying purchases.
History

Banana pudding has a rich history rooted in the Southern United States, where it became a beloved dessert at family gatherings and potlucks in the early 20th century.
This popular dessert draws inspiration from traditional English trifles, layering fruit, custard, and cookies for a delightful treat.
The introduction of instant pudding mix in the 1950s made preparing banana pudding easier, allowing more families to enjoy this comfort food.
Magnolia Bakery in New York City played a significant role in reviving the dessert's popularity during the late 1990s and early 2000s, showcasing its enduring appeal.
Today, banana pudding remains a cherished staple, reflecting the South's culinary traditions and emphasizing the importance of homemade pudding in creating lasting memories.
Recipe

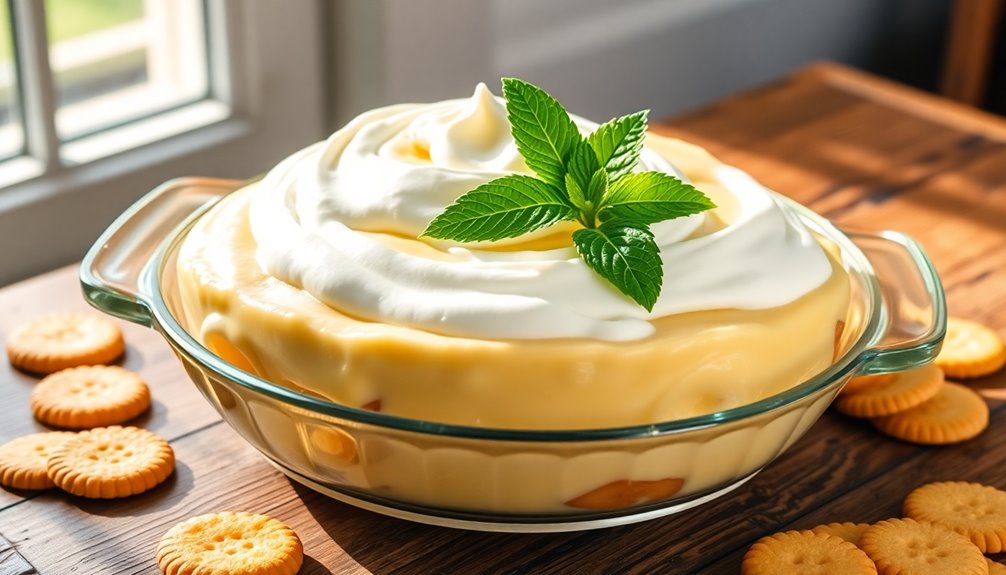
Banana pudding is a delightful and creamy dessert that has become a staple at many gatherings and potlucks. This classic recipe combines layers of velvety vanilla pudding, ripe bananas, and crunchy vanilla wafers, creating a delicious contrast in textures and flavors.
With its sweet, comforting taste, banana pudding is sure to please both kids and adults alike, making it the perfect choice for any occasion.
Preparing this dish is quick and easy, allowing you to whip up a crowd-pleasing dessert in no time. The beauty of banana pudding lies in its simplicity; you can have it ready and chilling in the fridge in under 30 minutes.
Once assembled, a little patience is required as the pudding must be refrigerated for at least an hour before serving, ensuring the flavors meld together beautifully.
Ingredients:
- 1 package instant vanilla pudding mix
- 2 cups milk
- 1 can (14 oz) sweetened condensed milk
- 1 container (8 oz) frozen whipped topping, thawed
- 4 ripe bananas, sliced
- 1 box vanilla wafers
Cooking Instructions:
In a large mixing bowl, whisk together the instant vanilla pudding mix and milk until smooth and thickened. Next, fold in the sweetened condensed milk and thawed whipped topping until well combined.
In a serving dish, layer the pudding mixture, sliced bananas, and vanilla wafers. Repeat the layers until all ingredients are used, finishing with a layer of pudding on top. Cover the dish and refrigerate for at least one hour before serving, allowing the flavors to develop.
Extra Tips:
For an enhanced banana flavor, consider using banana cream pudding mix instead of vanilla. If you're feeling adventurous, you can also add a layer of chocolate pudding or crushed chocolate wafers for a delicious twist on the classic recipe.
Remember to use ripe bananas for the best flavor and texture, and avoid browning by assembling the dessert shortly before serving if possible. Enjoy your homemade banana pudding!
Cooking Steps

To create the perfect banana pudding, you'll start by slicing ripe bananas evenly for consistent layering.
Then, layer the pudding and bananas in your dish, adding whipped cream generously on top.
Don't forget to chill the dessert before serving to let those flavors meld beautifully!
Step 1. Slice Ripe Bananas Evenly

Achieving even slices is crucial for a well-layered banana pudding. Use a sharp knife to cut your ripe bananas into uniform rounds, about 1/4 inch thick. This consistency allows for better layering and enhances the overall texture of your pudding.
Slice the bananas just before assembling to prevent browning, as they oxidize quickly when exposed to air. If you want a firmer texture, opt for slightly under-ripe bananas, which hold their shape better.
For a more aesthetic appeal, consider cutting the bananas on a diagonal instead of straight across. To further prevent browning, lightly brush the banana slices with lemon juice; it acts as a natural preservative and adds a subtle flavor to your delicious dessert.
Step 2. Layer Pudding and Bananas

Start by laying down a layer of vanilla wafers at the bottom of your serving dish for a solid foundation.
Next, take your sliced bananas and layer them evenly over the wafers. This ensures every bite has that delicious fruit flavor.
Now, prepare your pudding mixture by whisking together instant pudding mix with cold milk until it thickens into a creamy pudding. Pour this over the banana layer, letting it seep into the gaps.
Repeat the layering process: add another layer of vanilla wafers, followed by more sliced bananas, and finish with the remaining pudding mixture.
Finally, cover the top with whipped topping and refrigerate for at least one hour. This allows the flavors to meld beautifully in your banana pudding.
Step 3. Add Whipped Cream Generously

Once you've layered the pudding and bananas, it's time to add that luscious whipped cream on top.
Take a 16-ounce container of thawed frozen whipped topping or your homemade whipped cream, and gently fold it into the cream cheese and sweetened condensed milk mixture. This step ensures a light, airy texture and a creamy consistency that makes this Famous Banana Pudding irresistible.
Generously layer the whipped cream over the dessert, enhancing its visual appeal and providing a delightful contrast in texture with the banana slices and vanilla wafers below.
For an extra touch, sprinkle some crushed vanilla wafers or chocolate shavings on top of the whipped cream. This will elevate your dessert, making it even more inviting!
Step 4. Chill Before Serving

To ensure your banana pudding reaches its full potential, chilling it before serving is crucial. By refrigerating the pudding for at least one hour, or preferably four hours, you allow the flavors to meld beautifully, resulting in a more cohesive taste and creamy texture.
This optimal chilling time helps set the layers firmly, keeping them visually appealing and preventing any unwanted mixing.
Make sure to cover the pudding tightly with storage wrap to avoid absorbing odors from other foods in the fridge. Serving banana pudding chilled not only enhances its taste but also makes it a refreshing dessert, particularly during warm weather.
Enjoy the pronounced vanilla and banana flavors that develop after chilling!
Step 5. Add Vanilla Wafers on Top

Adding the finishing touch to your banana pudding is simple and rewarding. After layering the pudding mixture and sliced bananas, reserve some vanilla wafers for the top layer. This creates a crunchy contrast that enhances the dessert's visual appeal.
Crush the reserved vanilla wafers and sprinkle them over the whipped topping layer to add texture and flavor. For a more decorative presentation, arrange whole vanilla wafers in a pattern on top.
Chill the banana pudding for at least one hour to let the flavors meld and soften the top layer of wafers, making them more enjoyable. If you desire, add a sprinkle of crushed cookies or a few banana slices on top for an eye-catching garnish.
Enjoy your delicious dessert!
Final Thoughts

As you savor each bite of banana pudding, you'll appreciate why this classic dessert continues to be a favorite at gatherings. The creamy texture, thanks to the combination of vanilla pudding mix, whipped topping, and even a hint of cream cheese, elevates your homemade version.
Layering fresh bananas and vanilla wafers creates a delightful contrast that keeps everyone coming back for more. Remember to refrigerate your banana pudding for at least 4 hours, or overnight, to let the flavors meld perfectly.
While it can last up to 3 days in the fridge, freezing isn't recommended as it affects the texture. Enjoy experimenting with variations, but the classic recipe will always hold a special place in your heart!