Brewing Guides and Equipment
Coffee Mug Sizes a Guide to Different Cup Capacities and Styles
How do you choose the perfect coffee mug size for your brew? Discover the essential guide that reveals more than just cup capacities.
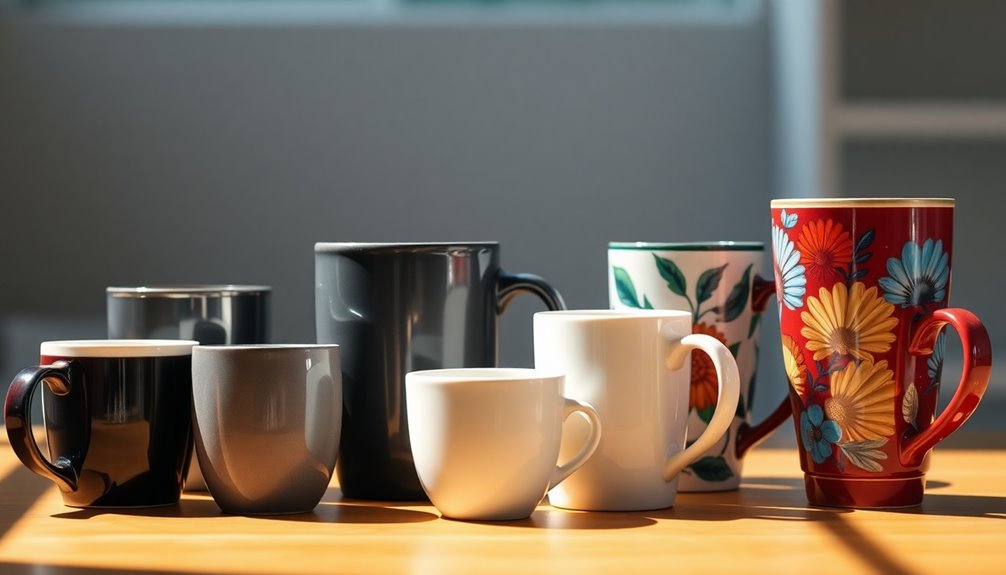
When it comes to coffee mug sizes, you've got plenty of options. Small mugs (2-3 oz) are perfect for espresso, while medium mugs (8-15 oz) suit your everyday coffee needs. For a standard drip coffee, stick to 8-10 oz. If you love generous servings, opt for larger mugs (15-25 oz) or travel tumblers (15-20 oz) for on-the-go sipping. Your choice of material—be it ceramic, glass, or stainless steel—also impacts flavor and heat retention. Finally, consider aesthetics and ergonomic designs for comfort. There's so much more to explore about choosing the right mug for your style and taste!
Key Takeaways
- Coffee mugs range from small (2-3 oz) for espresso to large (15-25 oz) for generous servings, catering to different beverage types.
- Ceramic and porcelain mugs are excellent for heat retention, while glass mugs provide pure taste and easy cleaning.
- Specialty mugs like cappuccino and flat white cups enhance the experience of specific drinks with their tailored sizes.
- Aesthetic options vary from classic designs to modern patterns, allowing personalization to suit individual tastes and styles.
- Functional features, including ergonomic grips and durability, enhance comfort and usability for daily coffee enjoyment.
Mug Size Variations
When it comes to coffee mugs, you'll find a variety of sizes to suit different preferences and occasions.
Small mugs, like espresso mugs and Turkish coffee cups, typically hold 2-3 ounces, perfect for concentrated shots.
Medium options, such as classic and latte mugs, range from 8 to 15 ounces, ideal for everyday coffee or tea. Standard size for drip coffee is about 8-10 oz, making it a versatile choice for many coffee lovers.
If you need something larger, travel mugs and oversized latte mugs can hold between 15 and 25 ounces, great for those who enjoy generous servings.
These larger mugs can even double as bowls for snacks!
With all these options, you can easily find the perfect size to match your mood or the beverage you're enjoying, ensuring each sip is just right.
Material Types and Properties
Choosing the right coffee mug size is only part of the equation; the material of your mug also plays a significant role in your overall coffee experience.
Ceramic and porcelain mugs are durable and retain heat well, making them great for keeping your drink warm. If you prefer a pure taste, go for glass; it doesn't impart flavors and is easy to clean. Material choice impacts not only the usability but also the overall taste experience of your coffee.
Stainless steel mugs excel in temperature control and portability, ideal for on-the-go coffee lovers. For something unique, consider stoneware or wooden mugs—they offer excellent insulation but may require more care.
Each material has its pros and cons, so think about your needs and preferences when selecting the perfect mug for your coffee.
Common Use Cases
Understanding common use cases for coffee mugs can help you pick the right one for your needs.
For everyday use, a classic mug of 8-15 oz is perfect for your daily coffee, while a standard mug around 8-10 oz works well for general sipping. Choosing the right size mug enhances the enjoyment of your beverage and ensures you have the appropriate beverage experience.
If you enjoy specialty drinks, consider a cappuccino mug (5-6 oz) or a flat white cup (8 oz) for those rich flavors.
When you're on-the-go, a travel tumbler or mug (15-20 oz) keeps your beverage hot and portable.
For lazy mornings, oversized mugs (20-25 oz) provide comfort and plenty of coffee.
Aesthetic and Design Options
With countless aesthetic and design options available, selecting the perfect coffee mug can be an enjoyable and personal experience. You can choose from classic black and white designs that offer timeless elegance or opt for two-tone styles that make a bold statement.
If you love words, typographic designs with inspirational quotes or witty sayings might resonate with you. Geometric patterns add a modern touch, while abstract designs provide a unique flair. Additionally, mugs can be designed for special occasions, enhancing the atmosphere of events like birthdays and holidays.
Don't forget color! Bold hues grab attention, while soft shades create a calming vibe. You can even personalize your mug with meaningful quotes or custom images.
Whether you lean towards minimalism or historical motifs, there's a coffee mug design that reflects your personality and style perfectly.
Functional Features of Mugs
While aesthetics play an essential role in selecting a coffee mug, its functional features are equally important for enhancing your daily coffee experience.
A well-designed mug fits the natural curve of your hand, providing a comfortable grip that reduces strain and minimizes the risk of spills. Look for materials that retain heat effectively, like ceramic or porcelain, which keep your coffee hot longer and protect your hands from burning. Ergonomic design can significantly enhance your drinking experience by promoting proper hand positioning and reducing discomfort.
Durability is also significant; high-quality mugs resist chips and stains, ensuring they last. Additionally, these mugs are often dishwasher and microwave safe, making cleanup a breeze.
Prioritizing comfort and practicality not only enhances your drinking experience but also supports your overall hand and wrist health.
Specialized Mug Types
When you choose a coffee mug, specialized options can greatly enhance your brewing experience.
Ceramic and porcelain mugs are durable and excellent at retaining heat, perfect for those who love hot beverages. If you prefer a modern touch, glass mugs showcase your coffee's color but may not hold heat as well. Mug material significantly influences flavor and temperature, making the choice of material essential for the best coffee experience.
For outdoor adventures, metal mugs offer outstanding durability and heat retention, though they can be heavier and might impart a metallic taste.
Specialty coffee mugs are designed for specific brews like cappuccino or espresso, often featuring double-walled construction for comfort and ideal heat retention. These mugs typically have a wider base and a narrower top to enhance the aroma and flavor profile of the coffee. Some specialty mugs are also designed to showcase the unique characteristics of different coffee bean origins, such as the acidity and body of a Kenyan coffee or the earthy notes of a Brazilian blend. With their dedication to highlighting the origins of joe coffee, these mugs have become a must-have accessory for coffee enthusiasts and connoisseurs.
These specialized mugs not only enhance your drinking experience but also elevate the aroma and temperature control of your favorite coffee.
Choosing the Right Mug
Choosing the right coffee mug can greatly enhance your brewing experience, as the perfect mug complements both your coffee preferences and lifestyle.
Start by considering material: ceramic offers timeless appeal and excellent flavor retention, while stainless steel is durable and great for heat retention but might alter taste. If you prefer a clear view of your drink, glass is a stylish option, though it doesn't retain heat as well. Additionally, different materials can significantly affect both the aesthetics and functionality of your mug.
Next, think about size; standard mugs usually hold 12 ounces, but larger options are great for extended sipping.
Don't forget design—personalized mugs add flair, and ergonomic handles guarantee comfort.
Ultimately, pick a mug that suits your taste, needs, and enhances every coffee moment.
Frequently Asked Questions
How Do I Properly Clean and Maintain My Coffee Mugs?
To properly clean and maintain your coffee mugs, start by washing them with mild dish soap and warm water after each use.
For tough stains, try a baking soda paste or a vinegar soak. Avoid abrasive scrubbers to protect your mugs' surfaces.
After cleaning, rinse thoroughly and dry them with a soft cloth or let them air dry.
Store them carefully to prevent chipping and check for stains regularly to keep them looking great.
Can I Use Ceramic Mugs in the Oven?
Yes, you can use ceramic mugs in the oven, but make sure they're specifically labeled as "oven safe."
Always check the manufacturer's instructions and avoid extreme temperature changes to prevent cracking. Typically, they can handle temperatures up to 350°F (175°C).
Are There Microwave-Safe Travel Mugs Available?
Yes, there are microwave-safe travel mugs available! You'll find many designed specifically for microwave use, although some may require you to remove the lid first.
Look for options made from materials like stainless steel or BPA-free plastics to guarantee safety. Always check the manufacturer's guidelines to confirm compatibility.
These mugs offer convenience, allowing you to reheat your beverages without hassle, making them a great choice for your busy lifestyle.
What Is the Best Mug for Hot Chocolate?
When you're picking the best mug for hot chocolate, consider ceramic for its heat retention and traditional feel, or opt for a double-walled glass to showcase its rich color.
If you're heading outdoors, a stainless steel mug offers durability and excellent insulation.
For a playful twist, silicone cups are flexible and unbreakable.
Each option enhances your hot chocolate experience, so choose one that fits your style and occasion!
How Can I Personalize My Coffee Mug?
You can personalize your coffee mug in several fun ways!
Try using vinyl for a sleek design—just cut your design, weed it, and apply it with transfer tape.
Alternatively, grab some Sharpie paint markers to create a unique look and bake it for durability.
Remember to clean the mug surface before applying anything, and consider sealing your design for extra protection.
Get creative and make it truly yours!
Conclusion
Now that you know the ins and outs of coffee mug sizes, materials, and styles, you're ready to choose the perfect mug for your needs. Whether you prefer a cozy ceramic for your morning brew or a sleek travel mug for on-the-go sipping, there's a mug out there that fits your lifestyle. Consider the functional features and aesthetic options to find something that not only serves your coffee but also reflects your personality. Happy mug hunting!
Arf, an author and an innovative enthusiast of coffee, coffee alternatives, and tea, plays a crucial role as a contributor to the esteemed Cappuccino Oracle platform. Renowned for his curiosity and passion for these captivating beverages, Arf has carved out a unique space for himself in the world of exploration and writing. He realized that coffee, coffee alternatives, and tea are not mere drinks to keep one awake, but universes of flavors and stories waiting to be explored.
Brewing Guides and Equipment
The Perfect Milk Frothing Pitcher for Latte Art
Navigate the world of milk frothing pitchers to discover the key features that elevate your latte art—your creativity awaits a perfect match!
To find the perfect milk frothing pitcher for your latte art, consider size, design, and material. A 15oz stainless steel pitcher is ideal for 6 to 10oz drinks, balancing control and capacity. Look for a conical shape to enhance steam circulation, and choose a pitcher with a well-designed spout to help you create intricate patterns. Regular maintenance is essential, so clean it after each use and air dry it upside down. With the right tools and techniques, you'll reveal your potential in latte artistry. There's much more to explore on how to master your frothing skills and elevate your creations.
Key Takeaways
- Choose a pitcher size based on your drink servings; 15oz is versatile for 6-10oz drinks, while 22oz suits larger beverages.
- Select a pitcher made of #304 stainless steel for durability and optimal heat retention during frothing.
- Look for ergonomic designs and specialized spouts for enhanced pouring control and intricate latte art creation.
- Ensure the pitcher has a conical shape to promote better steam circulation and achieve silky microfoam.
- Regular maintenance, including cleaning and drying techniques, is essential for maintaining the pitcher's performance and longevity.
Understanding Pitcher Sizes
When it comes to milk frothing pitchers, sizes matter. Choosing the right size can make all the difference in your coffee experience.
If you're working with smaller cups, a 10oz milk pitcher is perfect for 6oz servings. For slightly larger cups, the 15oz option accommodates 6-10oz drinks nicely.
When crafting lattes or cappuccinos, the 17oz pitcher works well for 8-12oz cups, ensuring you achieve that creamy texture.
If you often serve larger beverages or multiple drinks, the 22oz pitcher is your go-to for 12-16oz cups.
Having a variety of milk pitchers is essential for handling different drink orders efficiently while maintaining quality.
Key Design Features
When choosing a milk frothing pitcher, the shape of the spout plays an essential role in your pouring technique and the art you create.
You'll also want to take into account the material for durability and how the size fits your frothing needs.
Understanding these key design features can elevate your latte art to the next level.
Spout Shape Importance
The spout shape of a milk frothing pitcher plays an essential role in your ability to create stunning latte art. A well-designed spout allows for precision and control, which are important for intricate designs.
For example, the Kimera Tri-Spout innovation enhances your pouring techniques, enabling you to craft high-definition latte art with ease. If you're aiming for dramatic flow and versatility, a wide spout design is key for contrasting colors and defined patterns.
Additionally, pitchers with a conical trunk shape promote better steam circulation and milk texture, significant for successful frothed milk.
Ultimately, choosing a specialized milk frothing pitcher gives you greater sensitivity during pouring, helping you achieve those complex designs requiring skill and precision.
Material and Durability
Choosing the right material for your milk frothing pitcher considerably impacts its durability and performance. For best results, look for a pitcher made from #304 stainless steel, which is rust-proof, stain-proof, and crash-proof. A non-stick Teflon coating simplifies cleaning, preventing milk residue from accumulating.
Feature | Description |
---|---|
Material | #304 Stainless Steel |
Coating | Non-stick Teflon |
Dishwasher Safe | Yes |
An ergonomic design enhances comfort, allowing you to maintain control while pouring. Plus, a well-shaped spout is essential for crafting intricate latte art, making a high-quality milk pitcher a key tool in your barista arsenal. Invest wisely for lasting performance!
Size Versatility Considerations
A milk frothing pitcher's size can greatly impact your latte art experience. Choosing the right size guarantees you can create beautiful designs while maintaining efficiency.
Consider these options when selecting your milk frothing pitchers:
- 10oz – Perfect for single espresso shots or small cappuccinos.
- 15oz – Ideal for frothing milk for 6-10oz cups, striking a balance between size and control.
- 17oz – Offers flexibility for both medium drinks and quick service.
- 22oz – Best for larger 12-16oz servings, accommodating busy environments.
The conical shape of these pitchers enhances frothing and pouring control, elevating your latte art's quality.
Having multiple sizes at your disposal lets you respond quickly to varied customer demands, guaranteeing you always deliver the perfect cup.
Maintenance Tips
To keep your milk frothing pitcher in top shape, clean it with soap and warm water after every use.
Make certain to air dry it upside down to prevent any residual moisture from causing issues.
Cleaning After Each Use
Cleaning your milk frothing pitcher right after use is crucial for its longevity and performance. By doing so, you prevent milk fats, proteins, and sugars from hardening inside, which can lead to corrosion.
Follow these steps for effective cleaning:
- Rinse the pitcher with warm water to remove any milk residue.
- Use a few drops of soap and a non-abrasive sponge to clean the interior thoroughly.
- Rinse again with warm water to guarantee no soap remains.
- Air dry the pitcher upside down to avoid water spots and enhance its lifespan.
Regular cleaning not only guarantees hygiene but also keeps your pitcher free from lingering odors, preserving the quality of your future beverages.
Proper Drying Techniques
While it might be tempting to simply toss your milk frothing pitcher in the cupboard after washing, proper drying techniques are vital for maintaining its condition. Always air dry your milk frothing pitchers upside down to prevent water spots and promote thorough drying. This method helps extend the pitcher's longevity and avoids buildup that can harden over time. Here's a quick guide to drying your pitcher:
Step | Description |
---|---|
1. Air Dry | Place pitcher upside down on a rack. |
2. Wipe Exterior | Use a clean cloth to remove moisture. |
3. Check Moisture | Verify there's no remaining moisture. |
4. Store Properly | Keep in a dry, well-ventilated area. |
5. Regular Checks | Inspect before each use for hygiene. |
Following these tips will keep your pitcher in top shape!
Avoiding Milk Residue
Maintaining a clean milk frothing pitcher is key to avoiding milk residue that can affect your latte art and flavor. Here are some essential tips to keep your pitcher in top shape:
- Clean immediately: Rinse your pitcher with warm water and soap right after use to eliminate milk fats, proteins, and sugars.
- Inspect the spout: Regularly check and clean the spout to guarantee no residual milk affects your drinks.
- Air dry upside down: Allow your pitcher to dry upside down to prevent water spots and extend its lifespan.
- Use dedicated pitchers: Consider having separate pitchers for different types of milk to maintain flavor integrity and avoid cross-contamination.
Innovative Pitching Techniques
To master innovative pitching techniques, you need to explore the unique design features of specialized pitchers like the Kimera Tri-Spout. This pitcher enhances your control, allowing for intricate latte art designs.
Using a high flow rate pitcher, such as the WPM #30, lets you achieve dramatic pouring styles that improve definition and contrast in your art. The conical trunk shape of frothing pitchers promotes efficient milk frothing, essential for crafting the perfect microfoam texture.
Additionally, advanced pitchers are ergonomically designed for both free pouring and etching techniques, enabling you to create complex designs with precision.
With continuous practice using various pouring angles and pitcher shapes, you'll refine your skills and develop a unique latte art style that stands out.
Pricing and Availability
When you're looking to elevate your latte art game, understanding pricing and availability for milk frothing pitchers is essential.
Here are some great options to evaluate:
- 15oz Stainless Steel Latte Art Pitcher – Priced at $36.50, it's perfect for both professionals and home baristas.
- Blankenberg Latte Art Pitcher Bundle – Available for $40.00, this bundle includes multiple pitchers of different sizes for versatility.
- Latte Art Gift Set – Currently on sale for $71.00 (regularly $74.00), it's ideal for gifting or personal use.
- Monochrome Handleless Pitchers – Featuring shimmering coatings and colors like Cinder and Creamsicle, these stylish options will enhance your collection.
With these choices, you'll find the perfect pitcher to suit your needs.
Essential Tools for Latte Artists
As you plunge into the world of latte art, having the right tools at your disposal can make all the difference in perfecting your technique.
Start with high-quality milk frothers to create silky microfoam, essential for that ideal texture. Invest in specialized milk frothing pitchers, available in various sizes, to enhance your pouring control.
The Cyclone WDT Tool guarantees perfect espresso extraction, while the Force Tamper assures consistency in your coffee preparation.
To take your art further, consider advanced pitchers with unique spout designs, like the Kimera Tri-Spout, for intricate pouring techniques.
Finally, practice using wooden latte art etching pens to refine your ability to create complex designs like swans and geometric shapes.
Trends in Latte Art
Latte art is evolving rapidly, influenced by various trends that reflect both consumer preferences and barista creativity.
As you explore these trends, you'll notice how they shape the way you enjoy your coffee:
- Plant-based Milks: Oat and almond milks are changing how we froth, with specialized pitchers improving texture.
- Social Media Influence: Platforms like Instagram inspire baristas to craft eye-catching designs to attract followers.
- Barista Competitions: These events showcase intricate latte art, pushing innovations in pitcher design for complex techniques.
- Customization: Personalized latte art is on the rise, allowing baristas to express individuality while catering to consumer tastes.
These trends highlight how latte art continues to blend creativity with consumer demands, making each cup a unique experience.
Frequently Asked Questions
What Pitcher Is Good for Latte Art?
When you're looking for a pitcher that's great for latte art, consider one that holds around 15oz. This size works well with 6-10oz cups, giving you enough control for detailed designs.
A pitcher made from 304 stainless steel is durable and maintains milk temperature. Look for features like a conical shape for ideal frothing and pouring, and if you're in a busy café, color-coded pitchers can help streamline your workflow.
How Do You Froth the Perfect Milk for Latte Art?
Did you know that using high-fat milk can increase the creaminess of your microfoam by up to 30%?
To froth the perfect milk for latte art, start with high-fat milk and heat it to around 150-155°F (65-68°C).
Use a conical frothing pitcher for better control, and employ the free pouring technique to layer your milk.
Practice consistently to improve your hand stability and speed, mastering intricate designs like rosettas and tulips.
What Size Milk Pitcher for Latte Art?
When choosing a milk pitcher for latte art, consider the size based on your cup dimensions.
A 15oz pitcher works great for 6oz or 10oz cups, while a 17oz pitcher suits 8oz to 12oz cups, giving you versatility.
If you're serving larger drinks, a 22oz pitcher is best for 12oz to 16oz cups.
Each size helps you create intricate designs without overflow, so pick one that matches your serving style!
What Is the Best Shape for a Milk Frothing Pitcher?
The best shape for a milk frothing pitcher is a conical trunk design.
This shape gives you better control over the milk flow, which is essential for pouring. A narrower spout allows for precise pouring, enabling you to create detailed designs.
You'll also want a wide base for ideal frothing and a rounded body to help achieve that creamy microfoam.
An ergonomic handle will guarantee you maintain comfort and stability while pouring.
Conclusion
In the world of latte art, the right frothing pitcher transforms a simple cup of coffee into a masterpiece. While a larger pitcher offers room for creativity, a smaller one demands precision and control. You can elevate your skills with the perfect balance of size and design, turning each pour into a stunning visual treat. Embrace innovation and tradition, and let your passion for latte art shine through every meticulously crafted cup. Your journey awaits—so pour with purpose!
Noah, the Editor-in-Chief at Cappuccino Oracle, plays a pivotal role in shaping the voice and vision of our renowned platform. With an unwavering passion for coffee, coffee alternatives, and tea, Noah leads Cappuccino Oracle towards new horizons in the realm of coffee journalism.
Noah’s upbringing immersed him in the distinct aromas of artisanal coffee roasters, sparking a fascination that continues to fuel his professional journey. He joined Cappuccino Oracle as a senior editor and later assumed the position of Editor-in-Chief. Under his guidance, our platform has flourished into a trusted source for coffee, coffee alternatives, and tea lovers worldwide.
Brewing Guides and Equipment
How to Use Nespresso Aeroccino
Learn the simple steps to master your Nespresso Aeroccino and unlock the secret to perfect milk froth for your coffee creations.
Using a Nespresso Aeroccino is easy and fun. Start by pouring cold, pasteurized milk into the jug, filling it to the lower line for hot froth. Press the button, and in about 15 seconds, you'll have creamy foam ready to enhance your coffee. For cold foam, fill it only to the upper line, and enjoy the results. Experiment with different milk types for varied flavors and textures. Clean your frother after each use, ensuring it remains in great shape. There's plenty more to discover about the Aeroccino to help you master your milk frothing experience.
Key Takeaways
- Fill the Aeroccino jug with cold, pasteurized milk up to the designated indicator line for optimal frothing results.
- For Aeroccino3, press the button to heat and froth the milk, achieving creamy foam in about 15 seconds.
- Use the Barista Milk Frother app to select frothing options for diverse beverages, including both hot and cold milk froth.
- Clean the Aeroccino after each use by rinsing the jug and whisk under running water; avoid using abrasive materials.
- Regularly maintain the Aeroccino by ensuring all components are dry and properly assembled before storing to prevent technical issues.
Overview of Nespresso Aeroccino
The Nespresso Aeroccino is your gateway to effortlessly crafting café-quality beverages at home. This compact milk frother is designed to create both hot and cold creamy foam, elevating your espresso drinks in just moments.
With a simple push of a button, you can achieve light, velvety froth in only 15 seconds for hot milk, or hold the button longer for cold foam. Its impressive max capacity of 8.2 oz for hot milk and 4 oz for froth accommodates various coffee beverage sizes.
Plus, the Aeroccino is compatible with any Nespresso machine, making it a versatile accessory for coffee lovers. Forget bulky cappuccino machines—this sleek design brings the barista experience right into your kitchen, no skills required.
Types of Nespresso Frothers
Nespresso frothers come in three main types, each catering to different preferences and frothing needs.
The Aeroccino3 is perfect for those seeking quick results, allowing you to prepare both hot milk and cold foam with just a button press.
If you want more versatility, the Aeroccino4 offers two types of hot milk froth and cold foam options, along with an ergonomic design for easy handling.
For the adventurous, the Barista Milk Frother pairs with an app, letting you explore a variety of recipes and frothing techniques.
- Aeroccino3: Fast and user-friendly
- Aeroccino4: Versatile with ergonomic design
- Barista Milk Frother: App integration for creativity
- All frothers: Compatible with various milk types
Choosing the Right Milk
When it comes to choosing the right milk for your Nespresso Aeroccino, the type you pick can make a big difference in your drink's texture and flavor.
Whole dairy milk creates a rich, creamy foam, while low-fat or skim milk gives you a lighter option.
If you prefer non-dairy alternatives, options like soy, almond, and oat milk can also froth beautifully—just make sure they're cold for the best results.
Best Milk Types
Choosing the right milk can greatly enhance your frothing experience with the Nespresso Aeroccino. The type of milk you choose affects the texture and richness of your cold milk froth.
Here are some options to take into account:
- Whole milk: Produces thick, creamy foam ideal for lattes and cappuccinos.
- Low-fat and skim milk: Creates lighter froth with larger bubbles for a less rich texture.
- Pasteurized milk: Recommended for stable foam consistency and better results.
- Non-dairy alternatives: Soy, almond, and oat milk can also be frothed; opt for refrigerated versions for best performance.
Experimenting with different milk types lets you customize your beverage experience and discover your perfect frother match!
Non-Dairy Alternatives
If you're looking to explore non-dairy alternatives for frothing, you'll find a range of options that can elevate your coffee experience.
Soy milk is a standout choice, creating a creamy foam similar to whole dairy milk. Just make sure to choose barista-style soy milk for the best frothing results.
Almond milk can also work, but it generally produces a lighter foam with larger bubbles, so testing different brands is essential.
Oat milk provides a rich, creamy texture that froths beautifully and adds natural sweetness to your drink.
When selecting non-dairy alternatives, avoid options with added sugars or stabilizers, as they can hinder foam quality.
Additionally, using raw food diets can enhance your overall health, making your coffee experience even more enjoyable.
Enjoy your frothy creations with these delightful alternatives!
Using Aeroccino3 for Hot Milk
To prepare milk for frothing with the Aeroccino3, fill the jug to the lower indicator line and make sure it's dry and properly positioned on the base.
Once you're set, press the button to start heating and frothing—watch for the red light to know it's working.
In just about 15 seconds, you'll have light, creamy hot foam ready for your coffee.
Preparing Milk for Frothing
For the perfect frothy milk, start by filling your Aeroccino3 to the lower indicator line with cold, pasteurized milk.
Using the right milk is essential for the best results. Remember to:
- Fill the milk frother carefully to avoid spills.
- Use cold, pasteurized milk for ideal froth quality.
- Position the jug correctly in the base for proper heating.
- Press the button to activate the frothing process.
Once you've added the milk and positioned everything correctly, just press the button, and watch as the Aeroccino3 efficiently creates light, creamy foam in about 15 seconds.
It's quick and easy, making your beverage preparation a breeze! Enjoy your delicious frothy milk!
Operating the Aeroccino3
Now that you've prepared your milk for frothing, operating the Aeroccino3 for hot milk is straightforward.
First, fill the jug to the maximum line indicated inside. This guarantees ideal frothing and steaming.
If you're using milk at refrigerated temperature, pour it in and then press the button on the device. The red light will illuminate, indicating that the milk is heating.
In just 15 seconds, you'll have light, creamy foam ready for your favorite beverage.
Once you're done, don't forget to clean the Aeroccino3 after each use. This prevents milk residue buildup, which can affect performance and flavor.
Enjoy your perfectly heated milk with ease!
Using Aeroccino4 for Hot Milk
If you're looking to create perfectly heated milk for your favorite beverages, using the Aeroccino4 is a simple and efficient option.
Start by filling the container to the maximum capacity of 8.2 ounces, ensuring you don't exceed the line for ideal hot milk without froth.
Press the button once, and the red light will show that heating has started, achieving warm milk in about 70 seconds.
Once heated, the Aeroccino4 automatically stops, allowing you to pour the hot milk directly into your drink for a creamy texture.
- Use fresh, cold milk for the best flavor.
- The maximum capacity is 8.2 ounces.
- It heats milk without froth.
- Enjoy your beverages with the perfect cream texture.
Using Barista Milk Frother
While enjoying your favorite coffee drinks, the Barista Milk Frother makes it easy to achieve barista-quality froth at home. Simply pour your milk to the indicated level, choose your frothing option on the app, and hit start for quick results. This frother prepares both hot and cold milk froth, perfect for cappuccinos and lattes.
Frothing Option | Milk Type | Result |
---|---|---|
Hot Froth | Whole Milk | Creamy & Thick |
Cold Froth | Almond Milk | Light & Airy |
Hot Froth | Oat Milk | Rich & Velvety |
Cold Froth | Soy Milk | Smooth & Silky |
Hot Froth | Skim Milk | Light & Fluffy |
Cleaning is easy, as all parts except the base are dishwasher safe. Enjoy your frothy creations!
Frothing Techniques and Tips
When it comes to frothing, choosing the right milk is key to achieving your desired foam texture.
You'll want to take into account the temperature of your milk as well, since colder milk often leads to better frothing results.
Plus, mastering techniques for latte art can elevate your coffee experience, so let's explore how to perfect your frothing skills.
Optimal Milk Selection
Selecting the right milk is essential for achieving the perfect froth with your Nespresso Aeroccino. Whole dairy milk is your best option for a thick, creamy foam thanks to its higher fat content.
If you prefer non-dairy alternatives, consider soy, almond, or oat milk, but make sure they're refrigerated for ideal frothing.
- Fill the milk to the indicated level on the jug to prevent overflow.
- Experiment with different milk types for unique frothing results.
- Pour the frothed milk immediately after preparation to maintain its quality.
- Remember, low-fat and skim milk produce lighter foam with larger bubbles.
With these tips, you'll enjoy the best frothed milk for your coffee creations!
Frothing Temperature Considerations
To achieve the finest froth with your Nespresso Aeroccino, it's crucial to start with cold, pasteurized milk. The temperature of your milk greatly impacts the foam quality; colder milk creates denser, creamier froth.
Whole milk is your go-to for richness, while low-fat and skim options will yield lighter foam with larger bubbles. If you prefer non-dairy alternatives, soy, almond, and oat milk can be frothed, but results vary based on their formulations.
For best results, fill the frother up to one of the indicated levels and froth for about 15 seconds. Remember to pour immediately after frothing to maintain the ideal texture and temperature, ensuring your coffee drinks taste their best.
Techniques for Latte Art
Creating beautiful latte art is an exciting way to elevate your coffee experience, and with the right techniques, you can make stunning designs that impress.
Start by using cold, fresh whole dairy milk for a thicker, creamier foam. Pour slowly into your espresso at a slight angle, beginning high and lowering as you fill the cup.
Practice various pouring techniques to master your skills:
- Use circular motions for rosettas
- Try a straight pour for hearts
- Experiment with different heights for diverse effects
- Always clean the Aeroccino after use to maintain froth quality
With patience and practice, you'll create delightful latte art that showcases your barista skills! Additionally, using high-performance models can enhance your overall coffee experience by ensuring the best milk frothing quality.
Don't forget the whisk and spring for perfect frothing!
Cleaning the Aeroccino3
Cleaning the Aeroccino3 after each use is essential to prevent milk residue buildup and guarantee peak performance.
Start by rinsing the jug and whisk under running water. Use a non-abrasive cloth to wipe down the jug, making certain no milk remains. Since the whisk and jug aren't dishwasher safe, handwashing is the best method to maintain their integrity.
To thoroughly clean, disassemble the whisk from the jug by gently twisting it to remove any stuck milk particles.
After cleaning, make certain the jug is completely dry before placing it back on the base to avoid electrical issues or mold growth.
For detailed cleaning instructions, consult the user manual to guarantee proper maintenance and longevity of your Aeroccino3.
Cleaning the Aeroccino4
Although maintaining your Aeroccino4 might seem challenging, regular cleaning is essential for ideal performance and hygiene.
Make it a habit to clean the Aeroccino4 after each use to prevent milk residue buildup. All components, except for the base, are dishwasher safe, making cleanup a breeze. For thorough maintenance, handwash with warm water and non-abrasive detergent.
Here are some key cleaning tips:
- Confirm the jug is completely dry before returning it to the base.
- Refer to the manufacturer manual for detailed cleaning instructions.
- Regular cleaning helps avoid technical diagnosis issues down the line.
- Avoid using abrasive materials that could damage the surfaces.
Maintaining the Barista Milk Frother
After taking care of your Aeroccino4, it's time to focus on maintaining the Barista Milk Frother. To guarantee peak performance and hygiene, clean the frother after each use to prevent milk residue buildup.
Most parts, except the base, are dishwasher safe at a maximum temperature of 70℃ for easy maintenance. However, handwashing with warm water and a gentle detergent is recommended for thorough cleaning.
Regularly check the frothing whisk and other components for wear and tear; replace any damaged parts to maintain frothing quality.
Finally, store the Barista Milk Frother in a dry location to prevent moisture accumulation, which can impact its longevity.
Simple maintenance will keep your frother working beautifully for all your milk frothing needs!
Frequently Asked Questions
How Do I Use My Nespresso Aeroccino?
To use your Nespresso Aeroccino, first fill the jug to the appropriate level for your desired outcome—lower for froth, maximum for heated milk.
Press the button once for hot froth (red light) or hold it down for cold foam (blue light). For best results, use cold, pasteurized milk.
After each use, rinse the jug and whisk, and make sure everything's dry before placing it back on the base to avoid issues.
Enjoy your creamy creation!
How Do You Make Hot Milk in Nespresso Aeroccino?
Pouring perfectly, you'll fill the Aeroccino jug to the max line with cold, pasteurized milk.
Press the button and watch for the red light; that means it's heating. In about 80 seconds, your milk will transform into a creamy concoction.
Once it's done, pour it right away into your coffee creation for a delightful drink.
Enjoy the smooth texture and rich flavor that elevates your morning routine to a whole new level!
What Are the Two Max Lines in Aeroccino?
The two max lines in the Aeroccino are essential for your frothing and heating tasks.
The lower line indicates the maximum level for frothing milk, which is 4 oz, ensuring you get that perfect foam consistency.
The upper line marks the limit for heating milk without froth, set at 8.2 oz.
Following these lines helps prevent overflow and guarantees excellent results, so always keep an eye on them during use!
How Much Milk Do You Put in a Nespresso Aeroccino?
When you're frothing milk with a Nespresso Aeroccino, you should fill it to the lower indicator line if you want froth.
For heating milk without froth, go up to the maximum line.
Remember, the Aeroccino 3 froths up to 4 oz, while the Aeroccino 4 handles 8.2 oz of hot milk.
Always avoid exceeding these lines to prevent overflow and achieve that perfect frothing consistency you desire!
Conclusion
Using the Nespresso Aeroccino can transform your coffee experience, making every cup feel like a café treat right at home. You'll find that the right milk and frothing technique make all the difference, coincidentally revealing your inner barista. As you experiment with different styles and flavors, you might just stumble upon your new favorite drink. So, embrace the frothing journey, and let your creativity flow with each delightful sip!
Noah, the Editor-in-Chief at Cappuccino Oracle, plays a pivotal role in shaping the voice and vision of our renowned platform. With an unwavering passion for coffee, coffee alternatives, and tea, Noah leads Cappuccino Oracle towards new horizons in the realm of coffee journalism.
Noah’s upbringing immersed him in the distinct aromas of artisanal coffee roasters, sparking a fascination that continues to fuel his professional journey. He joined Cappuccino Oracle as a senior editor and later assumed the position of Editor-in-Chief. Under his guidance, our platform has flourished into a trusted source for coffee, coffee alternatives, and tea lovers worldwide.
Brewing Guides and Equipment
Breville Barista Express Espresso Machine Review
I discovered why coffee lovers rave about the Breville Barista Express, but what unique features set it apart from other espresso machines?
The Breville Barista Express is a fantastic choice for coffee enthusiasts like you. With its built-in grinder and dual boiler system, you can brew and steam simultaneously, ensuring a rich espresso flavor every time. It's compact and stylish, perfect for smaller kitchens. The machine's customizable settings make it easy to tailor your brews to your taste. Users rave about its performance and consistent quality at an affordable price of $699.95. Maintenance is straightforward, ensuring your machine stays in top shape. Want to learn more about what makes this espresso machine stand out?
Key Takeaways
- The Breville Barista Express combines an integrated grinder and dual boiler system for efficient espresso brewing and steaming.
- It features 18 grind settings and customizable brewing parameters for a tailored coffee experience.
- Users appreciate its compact design, making it ideal for smaller kitchens without sacrificing performance.
- Regular maintenance, including cleaning and descaling, is essential for optimal machine longevity and performance.
- Priced at $699.95, it offers professional-grade features at an affordable cost compared to competitors.
Overview of the Breville Barista Express
When you're searching for a high-quality espresso machine that combines convenience and performance, the Breville Barista Express stands out as a top contender.
This all-in-one espresso machine features a built-in grinder, allowing you to grind fresh beans while brewing. With its PID temperature control, you can choose from six adjustable settings for peak extraction.
The dual boiler system lets you brew and steam simultaneously, making your coffee preparation quick and efficient. Plus, the 8-ounce bean hopper and 18 grind settings provide customizable grind sizes, ensuring you get the perfect shot every time.
It also comes with a stainless steel milk pitcher, catering to home baristas who appreciate both functionality and style in their coffee-making experience.
Key Features and Benefits
The Breville Barista Express packs a punch with its integrated grinder, making it easy for you to enjoy freshly ground coffee at home.
You can customize your brewing parameters to achieve the perfect espresso, while its compact and stylish design saves space in your kitchen.
Let's explore how these features enhance your coffee-making experience.
Integrated Grinder Convenience
Not only does the Breville Barista Express streamline your espresso-making experience, but its integrated grinder also elevates the quality of your brew.
Featuring a stainless steel conical burr grinder with an 8-ounce bean hopper, it lets you grind fresh coffee beans right before brewing, ensuring ideal flavor. You can customize the grind size with 18 adjustable settings, achieving perfect extraction tailored to your taste.
The automatic dosing function dispenses the precise amount of coffee into the portafilter, enhancing convenience and consistency. With its user-friendly interface, the integrated grinder simplifies the process for both beginners and experienced baristas.
This all-in-one design saves counter space and eliminates the hassle of managing multiple coffee-making devices, making your espresso journey enjoyable.
Adjustable Brewing Parameters
By offering adjustable brewing parameters, the Breville Barista Express empowers you to craft the perfect espresso tailored to your taste.
With features like customizable shot volume and PID temperature control, you can fine-tune your brewing experience. Adjust the pre-infusion time to enhance extraction, ensuring every cup is rich and flavorful.
You'll appreciate the 16 grind fineness settings, allowing you to achieve the ideal grind for various espresso styles. Plus, with an adjustable coffee dosage range between 18 and 22 grams, you can effortlessly switch between single and double shots.
- Customize shot volume to suit your preference
- Control PID temperature for optimal extraction
- Modify pre-infusion time for better flavor
- Adjust coffee dosage for tailored brewing
Additionally, regular maintenance such as cleaning the machine's components can greatly enhance its longevity and performance.
Compact and Stylish Design
Crafting the perfect espresso isn't just about the brew; the machine's design plays a significant role in your overall experience. The Breville Barista Express combines a compact design with a stylish, polished stainless steel exterior that elevates your kitchen decor. Its dimensions of 12.5 x 15.9 x 13.8 inches guarantee it fits comfortably on your countertop without overwhelming the space.
Feature | Benefit | Description |
---|---|---|
Integrated Grinder | Streamlined process | Eliminates extra equipment |
Illuminated Control Panel | User-friendly | Enhances visibility in low light |
Rugged Construction | Durability | assures longevity without sacrificing style |
Compact Design | Space-saving | Fits easily on most countertops |
With its rugged construction, this machine appeals to both novice and experienced coffee enthusiasts alike.
Design and Build Quality
The Breville Barista Express is a standout in both design and build quality, featuring a polished stainless steel finish that not only enhances its upscale look but also guarantees durability for your kitchen.
With its compact design, measuring 12.5 x 15.9 x 13.8 inches and weighing 27 lbs, it fits perfectly in smaller spaces without compromising on sturdiness.
- A 67-ounce water tank with a sturdy handle makes refilling easy.
- The illuminated control panel guarantees you can navigate settings effortlessly.
- The high-quality portafilter adds a substantial feel, enhancing the overall premium build quality.
- Its sleek design complements any kitchen aesthetic, making it a stylish addition to your countertop.
Performance and Brewing Capabilities
When it comes to performance, the Breville Barista Express truly shines in espresso quality and flavor.
You'll appreciate the impressive grinding and extraction efficiency, thanks to the conical burr grinder and high-pressure extraction.
With precise control over brewing temperature and pre-infusion settings, you can craft each cup to your liking.
Espresso Quality and Flavor
With its high-pressure extraction system and a professional-style portafilter, the Breville Barista Express guarantees you get rich, balanced espresso shots every time.
The adjustable PID temperature control lets you fine-tune brewing temperatures between 187°F and 205°F, directly impacting espresso quality and flavor. The built-in conical burr grinder with 16 grind settings guarantees precise adjustments, optimizing flavor extraction.
Plus, the pre-infusion feature dampens coffee grounds for 10 seconds, enhancing saturation and flavor development.
- Achieve the perfect shot with real-time feedback from the pressure gauge.
- Enjoy consistent flavor profiles with automatic dosing.
- Experiment with grind settings for tailored taste.
- Savor balanced espresso with the machine's superior extraction capabilities.
Grinding and Extraction Efficiency
Achieving exceptional espresso isn't just about flavor; it also hinges on grinding and extraction efficiency.
The Breville Barista Express features a built-in conical burr grinder with 18 adjustable settings, enabling you to customize the grind size for ideal coffee extraction. Its precise PID temperature control keeps water between 187°F and 205°F, ensuring stable brewing conditions.
The pre-infusion feature dampens coffee grounds before extraction, enhancing flavor extraction for a balanced shot. With the capability to generate 15 bars of pressure, this machine delivers rich, flavorful espresso.
Plus, the automatic dosing function allows for precise coffee measurement, ensuring consistent extraction efficiency across brews. Together, these elements make your espresso experience both customizable and rewarding.
Maintenance and Care Requirements
To keep your Breville Barista Express running smoothly, regular maintenance and care are vital. After each use, disassemble and clean the portafilter and basket with hot water to guarantee peak performance.
Don't forget to wipe the steam wand to prevent milk residue buildup. Pay attention to the drip tray indicator; empty it when prompted for consistent upkeep.
For longer-term maintenance, follow the manual for descaling, especially if you use hard water.
Here are some key maintenance tips:
- Rinse the portafilter and basket after each use.
- Clean the group head and shower screen regularly.
- Use cleaning tablets and brushes for deep cleaning.
- Monitor the drip tray to avoid overflow.
Cost Efficiency and Savings
Investing in the Breville Barista Express can pay off quickly, especially when you consider the cost of coffee from cafes. By choosing homemade coffee, you can greatly boost your cost efficiency and savings. After about 120 cups, you'll break even compared to coffee shop prices, which range from $5 to $10. With lattes and cappuccinos, the savings increase, needing around 200 cups for maximum value. Plus, using freshly roasted beans at approximately $6 per pound not only enhances flavor but keeps your cost per cup low.
Coffee Type | Coffee Shop Price | Homemade Cost |
---|---|---|
Regular Coffee | $5 – $10 | $0.50 – $1.00 |
Lattes | $5 – $7 | $1.00 – $1.50 |
Cappuccinos | $5 – $7 | $1.00 – $1.50 |
Specialty Drinks | $6 – $10 | $1.50 – $2.00 |
Total Savings | – | $$$$$ |
Comparison With Competing Models
When comparing the Breville Barista Express to its competitors, you'll find it strikes an impressive balance between features and affordability. Priced at $699.95, it offers significant advantages over other Breville Espresso Machines.
While the Barista Pro and Barista Touch come with advanced features, they also demand higher price points.
Here's how the Barista Express stands out:
- Built-in grinder guarantees fresh grounds every time.
- Automatic dosing simplifies the brewing process.
- Competes well against budget models like the Gevi, which lacks quality.
- Offers a compact design, unlike the Rancilio Silvia M.
If you're looking for a solid home espresso machine that blends quality and convenience, the Barista Express is a strong contender among competing models.
User Experiences and Reviews
Many users have shared their experiences with the Breville Barista Express, highlighting its impressive ability to deliver high-quality espresso that rivals more expensive machines.
The integrated grinder is often praised for providing fresh coffee grounds, eliminating the hassle of additional equipment.
You'll appreciate the intuitive control panel and adjustable settings, making it easy to dial in your perfect espresso shots.
Users frequently mention the compact design, which fits seamlessly into smaller kitchens without sacrificing functionality.
Additionally, customer insights consistently note the value for money, as many feel the Barista Express offers professional-level features at a relatively affordable price.
Frequently Asked Questions
What Is the Lifespan of a Breville Barista Express?
The lifespan of a Breville Barista Express can vary, but with proper care, you can expect it to last between 5 to 10 years.
Regular cleaning, descaling, and maintaining the grinder play essential roles in its longevity. Many users report that their machines stay functional and effective even after years of daily use when maintained well.
Which Is Better, Barista Pro or Barista Express?
Choosing between the Barista Pro and Barista Express is like picking a favorite coffee blend—each has its unique flavor.
If you want speed and versatility, the Barista Pro's powerful grinder and faster heat-up time make it a standout.
However, if you're looking for a budget-friendly option that still delivers great espresso, the Barista Express shines.
It's really about your needs: convenience versus cost.
Whichever you choose, you'll enjoy brewing delicious coffee at home.
Why Is Breville so Popular?
Breville's popularity stems from its commitment to quality and innovation.
You'll love the robust construction and user-friendly designs that make their products accessible for everyone, from beginners to seasoned baristas.
The combination of functionality and style in their machines allows you to enjoy a premium coffee experience at home.
Plus, the extensive customization options let you tailor your brews exactly how you like them, enhancing your overall coffee journey.
Does Starbucks Use Breville?
You might think Starbucks uses Breville machines to whip up their iconic lattes, but that's a common misconception!
Instead, they rely on custom machines from brands like La Marzocco and Mastrena, built for the hustle and bustle of high-volume coffee production.
Breville's machines shine in home settings, where their user-friendly features cater to aspiring baristas like you.
Conclusion
To sum up, the Breville Barista Express offers an impressive blend of performance and convenience, making it a top choice for coffee lovers. Did you know that 80% of users report a significant improvement in their home espresso quality after switching to this machine? With its user-friendly design and consistent results, you'll find yourself enjoying café-quality drinks right in your kitchen. Investing in the Barista Express not only elevates your coffee experience but also saves you money in the long run.
Noah, the Editor-in-Chief at Cappuccino Oracle, plays a pivotal role in shaping the voice and vision of our renowned platform. With an unwavering passion for coffee, coffee alternatives, and tea, Noah leads Cappuccino Oracle towards new horizons in the realm of coffee journalism.
Noah’s upbringing immersed him in the distinct aromas of artisanal coffee roasters, sparking a fascination that continues to fuel his professional journey. He joined Cappuccino Oracle as a senior editor and later assumed the position of Editor-in-Chief. Under his guidance, our platform has flourished into a trusted source for coffee, coffee alternatives, and tea lovers worldwide.
-
Sustainability and Industry Trends1 day ago
The Future of Coffee: Trends and Predictions for 2025
-
Coffee Essentials2 days ago
Decoding Coffee Roasts How Roast Levels Affect Caffeine Content and Flavor
-
Brewing Guides and Equipment2 days ago
10 Strongest Starbucks Coffees From Blonde Roast to Nitro Cold Brew
-
FAQs1 day ago
Caffeine Content Comparison: Nespresso Vs Traditional Coffee Vs Energy Drinks
-
Coffee Alternatives2 days ago
Who Sells Mushroom Coffee Near Me
-
Coffee Essentials2 days ago
The Rich World of Brazilian Coffee a Guide and Brewing Tips
-
Brewing Guides and Equipment2 days ago
How to Empty Pods From Nespresso Vertuo
-
Recipes2 days ago
How to Make a Mocha Latte at Home: Easy 5-Minute Recipe