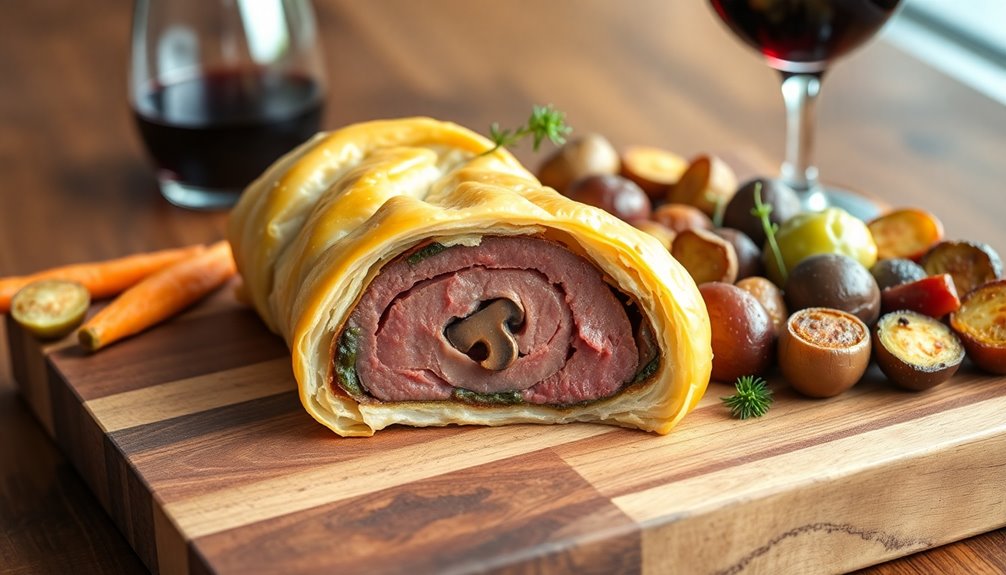
You're about to master the classic Beef Wellington, an elegant dish perfect for impressing guests. Start with a 2 lb beef tenderloin, sear it briefly in a hot skillet to lock in juices, then wrap it in savory mushroom duxelles and prosciutto. Encapsulate it in flaky puff pastry that you've rolled out, ensuring to seal the edges well. Chill the assembled Wellington for about 30 minutes before baking it at 400°F for 25-30 minutes until it's golden brown. Let it rest before slicing, and serve it with a rich red wine sauce for the ultimate feast. Curious for more tips?
Key Takeaways
- Start with a 2 lb beef tenderloin, sear it in a hot skillet for 2-3 minutes on each side for flavor.
- Prepare mushroom duxelles by sautéing finely chopped mushrooms until moisture evaporates, then season with salt and pepper.
- Wrap the seared beef in prosciutto, spread the mushroom mixture on top, and roll tightly using plastic wrap.
- Encase the wrapped beef in rolled-out puff pastry, seal edges with egg wash, and chill for 30 minutes before baking.
- Bake at 400°F (200°C) for 25-30 minutes until golden, aiming for an internal temperature of 125°F (52°C) for medium-rare.
Top picks for "beef wellington recipe"
As an affiliate, we earn on qualifying purchases.
History

Although the exact origins of Beef Wellington are debated, it's widely believed that the dish was named after the Duke of Wellington, who famously defeated Napoleon at the Battle of Waterloo in 1815.
You might find it interesting that the dish combines elements of British cuisine with French culinary techniques. The puff pastry encasing the beef reflects a trend in the early 19th century to elevate gourmet meals.
Over time, Beef Wellington became a symbol of festive dining and special occasions, often gracing holiday tables and upscale restaurants. The dish's reputation continued to grow, solidifying its place in culinary history.
Today, you can find various interpretations, but the essence of this classic remains, celebrating both tradition and creativity in cooking.
Recipe

Beef Wellington is a classic dish that combines the rich flavors of beef tenderloin with a savory mushroom duxelles and a flaky puff pastry. This elegant meal is perfect for special occasions, impressing guests, or simply indulging in a gourmet experience at home. The key to a successful Beef Wellington lies in using high-quality ingredients and guaranteeing that each component is prepared with care.
To achieve the perfect balance of flavors and textures, it's important to properly sear the beef and to guarantee that the mushroom mixture is well-cooked to prevent excess moisture from making the pastry soggy. While the recipe may seem intimidating, with a bit of patience and attention to detail, you can create a stunning centerpiece for your dining table that's sure to delight everyone.
Ingredients:
- 2 lb beef tenderloin
- Salt and pepper
- 2 tbsp olive oil
- 10 oz mushrooms, finely chopped
- 2 cloves garlic, minced
- 2 tbsp Dijon mustard
- 8 slices prosciutto
- 1 sheet puff pastry (thawed if frozen)
- 1 egg (beaten, for egg wash)
- Fresh thyme leaves (optional)
To prepare the Beef Wellington, first, season the beef tenderloin generously with salt and pepper. Heat the olive oil in a skillet over high heat and sear the beef on all sides until browned, about 2-3 minutes per side. Remove from heat and let it cool slightly.
In the same skillet, add the chopped mushrooms and garlic, cooking until the moisture has evaporated and the mixture is dry. Stir in thyme and let it cool. Spread the Dijon mustard over the cooled beef, then lay the prosciutto slices on a sheet of plastic wrap, slightly overlapping. Spread the mushroom mixture over the prosciutto, place the beef on top, and roll it tightly in the wrap. Chill for 15-20 minutes.
Roll out the puff pastry and place the wrapped beef in the center. Fold the pastry over the beef and seal the edges. Brush the top with egg wash and make a few slits for steam. Bake in a preheated oven at 400°F (200°C) for about 25-30 minutes or until the pastry is golden brown and the beef is cooked to your desired doneness.
When making Beef Wellington, it's essential to verify that your ingredients are fresh, particularly the beef and mushrooms, as they greatly impact the flavor of the dish. If you're looking for an extra flavor boost, consider adding a splash of brandy to the mushroom mixture while cooking.
Additionally, allowing the beef to rest after searing and before wrapping it in pastry will help to lock in the juices. Finally, for a beautiful presentation, serve with a rich red wine sauce or a simple side of roasted vegetables to complement the flavors of the Wellington.
Cooking Steps

To get started on your Beef Wellington, preheat your oven to 400°F.
Next, sear the beef in a hot skillet to lock in those delicious flavors, then wrap it in puff pastry.
After chilling the wrapped beef for 30 minutes, you'll be ready to brush the pastry with egg wash for that perfect golden finish.
Step 1. Preheat Oven to 400°F

Before you start assembling your Beef Wellington, you'll want to confirm your oven is preheated to 400°F. This step is essential because a properly heated oven guarantees even cooking and a perfectly flaky pastry.
To preheat, simply turn on your oven and set it to the desired temperature. It usually takes about 15-20 minutes for the oven to reach 400°F, so you can use this time to prepare your ingredients.
Keep an eye on the oven's indicator light or display to know when it's ready. Once it reaches the right temperature, you'll be set to create a delicious Beef Wellington that's golden brown and cooked to perfection.
Enjoy the process, and get ready for a culinary delight!
Step 2. Sear Beef in Hot Skillet

Once your oven is preheated, it's time to sear the beef in a hot skillet.
Heat a tablespoon of oil over medium-high heat until it shimmers. Carefully place the seasoned beef tenderloin in the skillet, ensuring it doesn't touch the sides. Sear each side for about 2-3 minutes until you achieve a rich, golden-brown crust. This step locks in the juices and enhances flavor.
Don't forget to sear the ends too; just roll the beef to get an even color all around.
Once it's beautifully browned, remove it from the skillet and let it rest for a few minutes. This will help maintain its juiciness when you wrap it up later.
Step 3. Wrap Beef in Puff Pastry

After letting the beef tenderloin rest, it's time to wrap it in puff pastry.
Roll out your puff pastry on a lightly floured surface until it's large enough to cover the beef completely. If you prepared any mushroom duxelles or prosciutto, spread it evenly over the pastry, leaving a border around the edges.
Place the beef in the center of the pastry, ensuring it's well coated with the mixture. Carefully fold the pastry over the beef, tucking in the edges to seal it tightly.
Use a sharp knife to trim any excess pastry, then gently press to secure the edges. Brush the outside with an egg wash for a beautiful golden color when baked.
Your Beef Wellington is now ready for the next step!
Step 4. Chill Wrapped Beef for 30 Minutes

To guarantee your Beef Wellington holds its shape and the pastry bakes evenly, you should chill the wrapped beef for 30 minutes.
This step helps the pastry firm up, ensuring it doesn't become soggy during baking. Place the wrapped beef on a plate and cover it with plastic wrap to prevent it from drying out.
While it chills, you can tidy up your workspace or prepare any accompanying sides. The cooling time also allows the flavors to meld and enhances the overall taste.
Once the 30 minutes are up, you'll be ready to proceed with the next steps, ensuring that your Beef Wellington will turn out beautifully golden and delicious.
Don't skip this vital step!
Step 5. Brush Pastry With Egg Wash

A golden, glossy finish makes all the difference in your Beef Wellington's presentation, so brush the pastry with egg wash before baking.
To create the egg wash, whisk one egg with a tablespoon of water or milk until smooth. This mixture not only adds shine but also helps the pastry achieve a beautiful, even color as it bakes.
Using a pastry brush, gently apply the egg wash over the entire surface of the wrapped beef, being careful to cover all edges and seams.
Don't forget the top and sides! This step enhances not just the look but also the flavor.
Once you've brushed it on, you're ready to pop the Wellington into the oven for that perfect, delectable finish.
Final Thoughts

As you reflect on your Beef Wellington journey, it's clear that the effort you put into this dish pays off with its impressive presentation and rich flavors.
You've crafted a meal that's not only a feast for the eyes but also a delight for the palate. Remember, each step, from searing the beef to wrapping it in pastry, contributes to the overall success.
Don’t hesitate to experiment with ingredients and techniques to make it your own. Whether for a special occasion or a cozy dinner, your Beef Wellington will surely impress your guests. To elevate your dish further, consider pairing it with a rich red wine reduction or a delicate sauce that complements the flavors of the beef. As you explore various culinary styles, don’t forget to indulge in frittata cooking tips and techniques, which can provide a delightful side dish or even a stunning brunch option. By combining these elements, you can create a memorable dining experience that showcases your culinary creativity.
With practice, you'll become more confident and skilled. So, gather your ingredients, put on your apron, and enjoy the delicious rewards of your culinary adventure!
Frequently Asked Questions
Can I Use a Different Type of Meat for Beef Wellington?
Sure, you can definitely use a different type of meat for a Wellington-style dish!
Many people have experimented with pork, lamb, or even poultry, and each brings its unique flavor and texture.
Just be mindful of cooking times, as different meats require varying levels of doneness.
You'll want to adjust seasonings and accompaniments to complement the meat you choose, ensuring your dish remains delicious and satisfying.
Enjoy experimenting!
How Can I Tell When My Beef Wellington Is Done Cooking?
To tell when your dish is done cooking, you'll want to rely on both time and temperature. Use a meat thermometer to check the internal temperature; for medium-rare, aim for about 130°F.
If you don't have a thermometer, look for a nicely browned exterior and a firm texture.
Let it rest for a few minutes after cooking—you'll get the best results when you slice into it! Trust your instincts!
What Side Dishes Pair Well With Beef Wellington?
When you're planning your meal, consider sides that complement your main dish's richness.
Roasted vegetables, like carrots and Brussels sprouts, add color and flavor. A creamy potato puree or garlic mashed potatoes can provide a comforting contrast.
You might also enjoy a fresh, vibrant salad with a tangy vinaigrette to balance the dish.
Don't forget about a rich red wine sauce; it can elevate the entire dining experience beautifully.
Can I Prepare Beef Wellington in Advance?
Yes, you can prepare Beef Wellington in advance!
You'll want to assemble it without baking, then wrap it tightly in plastic wrap and refrigerate. Just remember to bake it straight from the fridge to guarantee even cooking.
If you're short on time, you can also prepare the filling and pastry separately, keeping them in the fridge until you're ready to assemble.
This way, you'll have a delicious meal ready to go!
What Wine Goes Best With Beef Wellington?
When you're choosing a wine to pair with a rich dish, you can't go wrong with a full-bodied red.
A Cabernet Sauvignon or a Merlot complements the flavors beautifully, enhancing the savory notes without overpowering them.
If you prefer something lighter, a Pinot Noir also works well, offering a nice balance.
Don't forget to serve it slightly chilled for the best taste, letting you truly enjoy the meal's depth and complexity.