
To measure your coffee grinder’s cleanliness, start with a visual check for leftover grounds, oil buildup, or discoloration on burrs and chamber surfaces. Conduct smell and taste tests by grinding fresh coffee—off odors or off-flavors signal residue. Use a cleaning scorecard to rate parts cleanliness and keep a log for regular maintenance. Monitoring grind consistency before and after cleaning also helps, ensuring your grinder performs at its best—continue, and you’ll discover more effective techniques.
Key Takeaways
- Visually inspect burrs, chamber, and exterior for residual grounds, oil buildup, or discoloration.
- Use odor and taste tests with fresh coffee to detect lingering residues or off-flavors.
- Grind a small amount of rice or dry beans to check for residual oils or particles.
- Document cleaning frequency, methods, and observations in a maintenance log for consistency.
- Regularly monitor grinding performance and sound changes to identify potential cleanliness issues.
Understanding the Importance of a Clean Coffee Grinder

A clean coffee grinder is essential for brewing great coffee, as residual grounds and oils can quickly accumulate and affect the flavor. When your grinder isn’t spotless, it can dull the coffee aroma, making your brew less vibrant and aromatic. The grinder material plays a role in how easily it can be cleaned; stainless steel and ceramic burrs, for example, require different maintenance techniques. A buildup of old grounds and oils not only impacts taste but can cause uneven grinding, resulting in inconsistent brew strength. Regular cleaning preserves the grinder’s performance and ensures that each cup captures the true essence of your beans. Additionally, understanding the tuning laws can help prevent legal issues with modifications that might otherwise impact your equipment. Ultimately, maintaining a clean grinder helps you enjoy richer, fresher coffee every time, highlighting the importance of proper care.
Visual Inspection: What to Look For

To effectively assess the cleanliness of your coffee grinder, start with a thorough visual inspection. Look for visual cues like accumulated coffee grounds, oil buildup, or dark spots on the surface appearance. These signs indicate the grinder hasn’t been cleaned properly and could affect the flavor of your brew. Check the burrs or blades for residue or discoloration, which can trap old grounds and oils. Pay attention to any lingering debris or oily patches that don’t wipe away easily. A clean surface appearance should be free of visible particles, stains, or discoloration. Regularly inspecting your grinder visually helps you identify areas that need more attention, ensuring consistent performance and a fresh-tasting cup every time. Incorporating proper cleaning techniques can help maintain optimal grinder hygiene and prolong its lifespan.
Using a Coffee Grinder Cleaning Scorecard

Using a coffee grinder cleaning scorecard provides a simple and effective way to evaluate your grinder’s cleanliness consistently. This tool helps you assess key factors like residue buildup, oil presence, and overall hygiene, guaranteeing your grinder remains in ideal condition. When using the scorecard, consider your coffee grinder calibration to maintain consistent grind size and extraction quality. Also, pay attention to grinder material compatibility; some cleaning methods or tools may damage delicate parts. The scorecard guides you through specific criteria, making it easier to identify areas needing attention. Regular use ensures you don’t overlook subtle signs of dirt or oils that can affect flavor. Incorporating this method helps you maintain a clean, well-functioning grinder, ultimately improving your coffee’s taste and longevity. Supporting your well-being by keeping your equipment clean can also enhance your overall coffee experience.
Measuring Residual Coffee Grounds and Oils

To guarantee your grinder is thoroughly clean, you need to check for leftover coffee grounds and oil residue. By measuring residual grounds, you can determine if cleaning was effective or if a deeper clean is necessary. Evaluating oil buildup helps maintain the grinder’s performance and flavor consistency. Incorporating regular maintenance routines can prevent oily residue buildup, ensuring optimal grinding results.
Residual Grounds Detection
Have you ever wondered how to tell if your coffee grinder still has residual grounds or oils? Detecting leftover particles is essential for maintaining coffee quality. Start by inspecting the grinder visually—residual grounds often cling to the burrs or chamber, especially if you use stale coffee beans, which can cause grinder component wear. To accurately assess, consider these points:
- Run a small amount of fresh beans and observe any lingering grounds or oily residue.
- Listen for unusual grinding sounds, indicating old grounds stuck inside.
- Smell the grinder; stale or burnt aromas suggest residual oils or grounds remain.
- Using a Bluetooth headband can help you monitor grinder operation remotely, ensuring it functions smoothly during cleaning.
Regularly checking these signs helps ensure your grinder stays clean, preserves coffee bean freshness, and prevents unnecessary grinder component wear.
Oil Residue Assessment
Evaluating oil residues in your coffee grinder is crucial for maintaining peak flavor and performance. Oil buildup from previous grinds can accumulate on burrs and inside chambers, affecting taste and consistency. To assess residue buildup, inspect the grinding chamber and burrs visually; look for shiny, greasy spots. Use a clean, lint-free cloth or a paper towel to gently wipe surfaces—if they feel oily or leave residue, you need cleaning. You can also perform a simple test by grinding a small amount of rice; if the rice emerges oily or darker than usual, oils are lingering. Regularly checking for oil buildup helps you determine when a thorough cleaning is necessary, ensuring your grinder continues to produce fresh, flavorful grounds. Proper maintenance of your grinder is essential to prevent oil residues from affecting your coffee quality.
Timing Your Cleaning Routine Based on Usage

Since your coffee grinder’s usage varies, adjusting your cleaning schedule accordingly helps maintain ideal performance. High-traffic days or frequent use call for more frequent cleanings, while lighter use can extend the time between cleanings. Consider these factors:
- Different coffee bean variety, like oily vs. dry beans, impacts how often you need to clean
- Grinder material, such as burr vs. blade, influences buildup and cleaning frequency
- Your brewing habits, like espresso or drip, affect residue accumulation
- Regular cleaning can also help prevent the buildup of residue and oils, which can affect the flavor and performance of your grinder.
Testing Grind Consistency Before and After Cleaning

Before and after cleaning your coffee grinder, it’s important to test its grind consistency to guarantee peak performance. Changes in storage humidity can cause clumping or uneven grounds, so a consistent grind indicates the grinder’s health. Use the same beans and grind setting for both tests to accurately compare results. Pay attention to whether the grind size remains uniform or if there are inconsistencies, which might suggest buildup or motor strain. If the grind becomes more consistent after cleaning, it points to improved grinder motor health and reduced residual debris. Regular testing helps you identify when cleaning is needed and assures your grinder maintains ideal performance. This process keeps your coffee flavorful and your equipment functioning smoothly. Additionally, understanding the impact of tuning on your grinder can help optimize its operation and longevity.
The Role of Odor and Taste Tests in Measuring Cleanliness

Odor and taste tests are essential tools for evaluating how clean your grinder is. By using sensory evaluation techniques, you can detect lingering flavors or smells from previous beans. These simple tests help guarantee your grinder is truly free of residual residues that could affect future brews. Incorporating public health awareness into your cleaning routine can further ensure safe and hygienic coffee preparation.
Sensory Evaluation Techniques
Sensory evaluation techniques play a crucial role in appraising how clean your coffee grinder is, especially through odor and taste tests. These methods help you detect lingering residues that might affect flavor. Aroma profiling allows you to identify subtle scent differences, indicating cleanliness levels. Texture analysis involves examining the mouthfeel of brewed coffee to spot any off-flavors or residues. To improve accuracy, consider these points:
- Use consistent brewing methods for comparisons
- Rely on your senses rather than assumptions
- Document aroma and flavor changes over time
- Incorporating industry-standard testing methods can further enhance the reliability of your assessments.
Detecting Residual Flavors
Detecting residual flavors is essential for guaranteeing your coffee grinder is thoroughly clean. After cleaning, taste and odor tests help identify lingering coffee bean freshness or unexpected tastes from previous brews. If you notice any off-flavors or odors, it indicates that residues remain, affecting future coffee quality. Be mindful of grinder material compatibility, as some materials may absorb flavors or react with cleaning agents, making residual flavors harder to detect. Regular testing ensures you’re not just cleaning surface debris but removing oils and fine particles that can trap flavors. Use small amounts of freshly ground coffee for taste tests, and check for any unusual tastes or smells. This process guarantees your grinder maintains optimal flavor integrity and consistent performance. Additionally, understanding how to maximize your tan space out sessions wisely can help prevent skin damage and maintain a healthy glow while enjoying your coffee routine.
Keeping a Cleaning Log to Track Maintenance

Keeping a cleaning log for your coffee grinder helps you stay on top of maintenance and guarantees consistent performance. By tracking your cleaning schedule, you can identify patterns and ensure you don’t forget essential tasks. Regular log maintenance keeps you accountable and prevents buildup that affects flavor. Use your log to note when you last cleaned, what methods you used, and any issues encountered. This way, you’ll develop a routine that prolongs your grinder’s lifespan and maintains ideal performance. Incorporating attention to detail into your logging process can further improve your maintenance routine.
Remember to:
- Schedule cleanings based on usage frequency
- Record cleaning dates and procedures
- Review the log periodically to adjust your cleaning schedule as needed
Frequently Asked Questions
How Often Should I Calibrate My Coffee Grinder for Accuracy?
You should calibrate your coffee grinder every 2 to 4 weeks to maintain accuracy. Regular grinder calibration ensures your grind size stays consistent, which affects flavor and extraction. If you notice shifts in taste or brewing issues, it’s time for an precision adjustment. Frequent calibration helps prevent over- or under-extraction, keeping your coffee at its best. Make calibration part of your routine to enjoy ideal flavor with every brew.
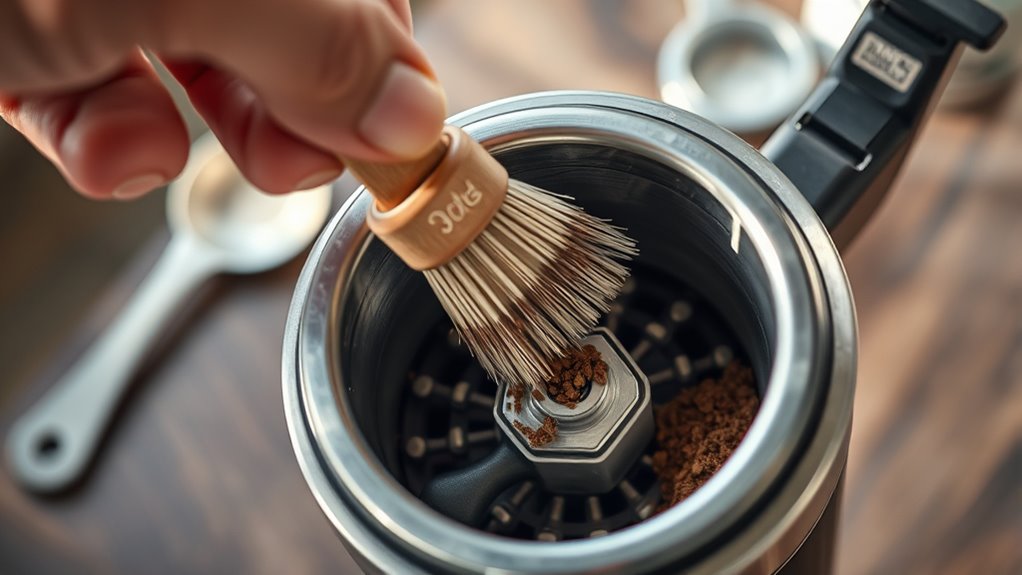
What Tools Are Best for Deep Cleaning Stubborn Grinder Residues?
Think of removing stubborn grinder residues like peeling paint—using the right tools makes all the difference. For detailed cleaning and residue removal, use a soft-bristled brush or a toothbrush to reach crevices. A vacuum cleaner with a brush attachment can also suck out debris. For stubborn buildup, try a mixture of rice and grinding to absorb oils. These tools guarantee your grinder stays clean and maintains ideal performance.
Can Cleaning Methods Affect the Grinder’s Lifespan?
Cleaning methods directly impact your grinder’s lifespan. Proper grinder maintenance, including gentle cleaning techniques and avoiding harsh chemicals, helps prevent wear and tear. Regular cleaning frequency keeps residues from damaging burrs or blades, extending your grinder’s life. Skipping or using improper cleaning methods can cause buildup, reduce efficiency, and lead to costly replacements. Stick to recommended cleaning routines to make sure your coffee grinder stays in top shape longer.
How Do I Know if My Grinder Needs Replacement Rather Than Cleaning?
Did you know that a typical coffee grinder lasts about 3 to 5 years? If your grinder’s performance declines despite regular cleaning, it’s time to contemplate replacement. Look for indicators like unusual noises, inconsistent grind size, or persistent jams. These signs suggest your grinder’s lifespan is nearing its end, and replacing it might be more cost-effective than continual repairs. Trust your senses—if it no longer functions well, it’s time to get a new one.
Are There Eco-Friendly Cleaning Solutions for Coffee Grinders?
Yes, you can use eco-friendly cleaning solutions like biodegradable cleaners and natural solvents for your coffee grinder. These options are gentle on the environment and safe for your health. Simply apply a small amount of natural solvent, like vinegar or baking soda mixed with water, to clean stubborn residues. Always make certain you rinse thoroughly to avoid any flavor transfer. Eco-friendly cleaners keep your grinder clean without harming the planet.
Conclusion
By measuring how well your coffee grinder cleans, you’re not just maintaining equipment—you’re preserving the essence of every brew. Think of your grinder as a silent guardian of flavor, revealing its cleanliness through subtle signs. Regular checks and logs turn routine maintenance into a mindful ritual, ensuring each cup remains a symphony of taste. After all, a spotless grinder isn’t just clean—it’s the gateway to perfection in every sip.