
Kombucha Tea
How to Make Fermented Kombucha Tea

I must confess, I was once doubtful about the idea of brewing my own fermented kombucha tea. However, after giving it a shot, I became absolutely enamored. The unique combination of its tangy flavor and bubbly texture is simply unbeatable.
And the best part? It’s actually pretty easy to make at home. In this article, I’m gonna walk you through the simple steps to brewing, fermenting, and bottling your own homemade kombucha.
Get ready to become a master kombucha brewer in no time.
Key Takeaways
- Choosing the right ingredients is crucial for producing high-quality kombucha.
- Different brewing methods offer versatility and options for personal preference.
- Fermentation process takes about 7 to 10 days but can vary.
- Store kombucha in the refrigerator to maintain flavor and fizziness.
Choosing the Right Ingredients
When making fermented kombucha tea, it’s important to choose the right ingredients. Finding the best tea leaves is crucial for producing a high-quality brew. Look for organic, loose-leaf black or green tea, as they contain the necessary compounds for fermentation. Avoid using tea bags, as they may have added chemicals or oils that can hinder the fermentation process.

Additionally, understanding the role of sugar is essential. Sugar acts as the fuel for the fermentation process, providing food for the SCOBY (symbiotic culture of bacteria and yeast). It’s recommended to use organic cane sugar or white granulated sugar, as they are easily digestible for the SCOBY.
Remember to use the proper ratio of tea leaves to sugar to ensure a successful and delicious batch of kombucha.
Brewing the Kombucha Tea
To brew it, you’ll need to let the mixture sit for 7-10 days to allow fermentation to occur. During this time, the SCOBY (Symbiotic Culture Of Bacteria and Yeast) will consume the sugar and transform it into beneficial acids and probiotics.
Here are some different brewing methods to try:
- Continuous Brewing: This method involves removing a portion of the fermented tea and adding fresh sweet tea in a continuous cycle.
- Batch Brewing: In this method, you brew a new batch of kombucha each time, starting from scratch.
- Second Fermentation: After the initial fermentation, you can add flavors like fruit or ginger and let it sit for a few more days to develop carbonation.
Troubleshooting common issues:
- Mold: If you see mold growing on your SCOBY or the surface of the tea, discard everything and start over with a fresh SCOBY.
- Vinegar-like taste: This could be a sign of over-fermentation. Reduce the fermentation time in your next batch.
- No carbonation: Make sure you have airtight bottles for the second fermentation and add a small amount of sugar to promote carbonation.
- Too sweet: Ferment for a longer period of time in the next batch.
Fermenting the Tea
During the fermentation process, you’ll notice bubbles forming in the mixture as the SCOBY consumes the sugar and transforms it into beneficial acids and probiotics. This transformation is what gives kombucha its unique tangy flavor and health benefits. The fermentation process typically takes about 7 to 10 days, but can vary depending on factors like temperature and the strength of the SCOBY. It’s important to monitor the fermentation process by tasting the kombucha daily to ensure it reaches the desired level of acidity. Once the fermentation is complete, you can strain the kombucha and transfer it into bottles for a second round of fermentation, which creates carbonation. It’s important to note that during the fermentation process, the alcohol content may increase slightly, but it is usually very low and safe for consumption. Overall, the fermentation process is what makes kombucha a delicious and nutritious beverage packed with probiotics and other health benefits.
| Fermentation Tips | Health Benefits | Flavor Combinations |
|---|---|---|
| Use a clean jar and cover it with a cloth or coffee filter to allow airflow | Supports gut health and digestion | Ginger + Lemon |
| Keep the jar in a warm, dark place away from direct sunlight | Boosts immune system | Raspberry + Mint |
| Avoid using metal utensils or containers, as they can interfere with the fermentation process | Detoxifies the body | Blueberry + Lavender |
| Taste the kombucha daily to gauge the level of acidity | Rich in antioxidants | Peach + Basil |
| Experiment with different brewing times to find your preferred flavor profile | May help to reduce inflammation | Strawberry + Rose |
Bottling and Carbonating the Kombucha
After the fermentation process, you can strain the kombucha and transfer it into bottles for a second round of fermentation, which creates carbonation. This step is crucial for achieving that fizzy, refreshing taste that we all love in kombucha.
Here are some carbonation techniques and flavoring options to consider:
-
Carbonation Techniques:
-
Use airtight bottles to trap the carbon dioxide produced during fermentation.
-
Let the bottles sit at room temperature for a few days to allow carbonation to occur.
-
Burp the bottles daily to release excess pressure and prevent explosions.
-
Experiment with different fermentation times to achieve your desired level of carbonation.
-
Flavoring Options:
-
Add fresh fruit, such as berries or sliced citrus, to infuse flavors into the kombucha.
-
Try adding herbs or spices like ginger, mint, or lavender for a unique twist.
-
Consider using flavored tea or fruit juices for added depth of flavor.
-
Don’t be afraid to get creative and try different combinations to find your favorite.
Now that your kombucha is bottled and carbonating, let’s move on to the next step: storing and enjoying your homemade creation.
Storing and Enjoying Your Homemade Kombucha
Now that you’ve bottled and carbonated your homemade kombucha, it’s time to store it properly and enjoy the fruits of your labor.
Storing your kombucha correctly is crucial for maintaining its flavor and fizziness. The best method is to keep it in the refrigerator, as this slows down the fermentation process and helps retain its taste. You can store your kombucha in glass bottles with airtight lids to prevent any contamination and maintain its carbonation.
It’s important to note that the longer you store it, the more acidic it becomes, so it’s best to consume it within a few weeks for optimal taste.
Now, let’s talk about flavor variations. Once you’ve mastered the basic kombucha recipe, you can experiment with adding different fruits, herbs, or spices during the second fermentation process. This allows you to create unique and delicious flavor combinations that suit your preferences.
Enjoy exploring the endless possibilities of homemade kombucha!
Conclusion
In conclusion, making fermented kombucha tea is like embarking on a journey of transformation. With the right ingredients and brewing techniques, you can witness the magical alchemy of tea turning into a tangy and effervescent elixir.
Just like the tea leaves, we too can undergo a fermentation process, growing and evolving into something greater than before.
So, take a leap of faith, embrace the art of kombucha-making, and savor the rewards of a homemade tonic that nourishes both body and soul.
Cheers to the power of fermentation!

Arf, an author and an innovative enthusiast of coffee, coffee alternatives, and tea, plays a crucial role as a contributor to the esteemed Cappuccino Oracle platform. Renowned for his curiosity and passion for these captivating beverages, Arf has carved out a unique space for himself in the world of exploration and writing. He realized that coffee, coffee alternatives, and tea are not mere drinks to keep one awake, but universes of flavors and stories waiting to be explored.
Arf’s articles for Cappuccino Oracle blend meticulous research with personal experiences, providing readers with an in-depth understanding of various types of coffee, coffee alternatives, and tea, along with their unique characteristics, cultures, and histories. His honest reviews and engaging narratives guide readers on their own journeys, helping them discover their preferences and find their perfect brew.


As someone who is passionate about health and enjoys doing research, I have always been fascinated by the effectiveness of natural remedies.
And let me tell you, kombucha is truly miraculous. This fermented tea has gained popularity for its health benefits, from reducing joint pain to improving digestion.
But that’s not all – kombucha also detoxifies our bodies, boosts immunity, and provides a natural source of energy.
Join me on this journey as we uncover the wonders of kombucha and unlock the secrets to a healthier, more vibrant life.
Key Takeaways
- Kombucha has anti-inflammatory properties that can help with arthritis and gout.
- Kombucha contains probiotics that improve gut health and aid in digestion.
- Consuming kombucha in moderation can aid in weight management and promote regularity.
- Kombucha’s antioxidants protect against free radical damage and contribute to healthy skin and hair.
The Origins of Kombucha’s Healing Powers
While the exact origins of kombucha’s healing powers are still debated, it’s widely believed that its beneficial properties stem from the fermentation process. Fermentation involves the action of bacteria and yeast on the sweetened tea mixture, resulting in the formation of organic acids, vitamins, enzymes, and probiotics. These components contribute to the health benefits associated with kombucha.
Understanding the science behind kombucha’s health benefits is crucial in unraveling the secrets of its healing powers. Research suggests that kombucha’s probiotics improve gut health, its antioxidants protect against free radical damage, and its anti-inflammatory properties reduce joint pain and swelling. Additionally, kombucha aids in digestion, boosts immunity, and provides natural energy without the negative effects of caffeine.
While more research is needed, the evidence thus far supports the notion that kombucha offers a fountain of health.
A Boost for Digestive Health
I love how kombucha aids in digestion and promotes regularity, making it a great option for boosting digestive health. Kombucha contains probiotics that improve gut health by supporting the growth of beneficial bacteria in the intestines. These probiotics help break down food, absorb nutrients, and prevent harmful bacteria from thriving. The natural fermentation process of kombucha produces organic acids, enzymes, and vitamins that promote regularity and alleviate digestive issues such as bloating and constipation.
| Improving Gut Health | Promoting Regularity |
|---|---|
| Probiotics in kombucha improve the balance of gut bacteria, enhancing digestion and nutrient absorption. | The organic acids in kombucha stimulate bowel movements and prevent constipation. |
| Kombucha helps reduce inflammation in the gut, relieving symptoms of digestive disorders such as irritable bowel syndrome (IBS). | The enzymes in kombucha aid in breaking down food, facilitating smooth digestion. |
| The antioxidants present in kombucha protect the gut lining from damage caused by free radicals and inflammation. | Kombucha’s probiotics strengthen the intestinal barrier, preventing the entry of harmful pathogens. |
Incorporating kombucha into your daily routine can have a positive impact on your gut health and overall well-being. However, it is important to note that individual responses to kombucha may vary, and moderation is key. If you have any pre-existing health conditions or concerns, it is always advisable to consult with a healthcare professional before making any significant changes to your diet.
Kombucha’s Impact on Skin and Hair
Kombucha improves skin health and helps maintain hair color, as it’s rich in vitamins and minerals essential for healthy skin and hair. The antioxidants found in kombucha protect against free radical damage, which can contribute to aging. Additionally, the probiotics present in kombucha promote a healthy scalp and hair growth.
The acidity of kombucha also acts as a natural hair conditioner, adding shine and softness to the hair. While more research is needed to fully understand the extent of kombucha’s effects on aging, preliminary studies suggest that it may have positive impacts on reducing inflammation and improving skin elasticity.
Overall, incorporating kombucha into your skincare and haircare routine may provide additional benefits in maintaining a youthful appearance and promoting healthy hair growth.
Relieving Arthritis Pain With Kombucha
I’ve found that adding kombucha to my daily routine has helped in relieving arthritis pain by reducing inflammation and providing natural energy. Here are three ways kombucha can promote joint health and reduce inflammation:
-
Anti-inflammatory properties: Kombucha contains compounds that have been shown to reduce inflammation in the body. By reducing inflammation, it can help alleviate joint pain and swelling associated with arthritis.
-
Probiotics for gut health: Kombucha is rich in probiotics, which promote a healthy gut. A healthy gut can contribute to reduced inflammation throughout the body, including in the joints.
-
Detoxification benefits: Kombucha has detoxifying properties that help eliminate harmful toxins from the body. By removing toxins, it can support joint health and reduce inflammation.
While more research is needed to fully understand the extent of kombucha’s benefits for arthritis, incorporating it into your daily routine may help in reducing inflammation and promoting joint health.
Exploring Kombucha’s Potential Benefits for Specific Health Issues
Occasionally, it’s important to explore kombucha’s potential benefits for specific health issues, as it may offer targeted relief and support for certain conditions.
One area of interest is kombucha’s effects on weight management. Some studies suggest that kombucha can aid in weight loss by decreasing body weight and BMI. It’s believed that the probiotics in kombucha contribute to improved gut health, which may have a positive impact on metabolism and digestion.
Another area of exploration is kombucha’s effects on liver health. Preliminary research indicates that kombucha may have positive effects on fatty liver, possibly due to its detoxifying properties. However, more research is needed to fully understand the extent of kombucha’s benefits for liver health.
As with any health-related topic, it’s important to approach kombucha as part of a balanced and varied diet, and to consume it in moderation to avoid potential health risks.
Frequently Asked Questions
Can Kombucha Cure Arthritis or Gout Completely?
No, kombucha cannot cure arthritis or gout completely. However, it may help with joint health due to its anti-inflammatory properties. It’s important to note that further research is needed to fully understand the benefits of kombucha for these conditions.
Is It Safe to Consume Large Quantities of Kombucha?
Yes, it’s safe to consume large quantities of kombucha as long as it’s done in moderation. Kombucha can aid in weight loss by promoting digestion and it also improves immune function.
Does Kombucha Have Any Negative Effects on Digestion or Gut Health?
Kombucha does not have any negative effects on digestion or gut health. In fact, it can improve gut flora due to its probiotic content. However, excessive consumption may contribute to leaky gut syndrome.
Can Kombucha Reverse the Effects of Aging on the Skin and Hair?
Yes, kombucha can help reverse the effects of aging on the skin and hair. Studies show that the antioxidants in kombucha reduce wrinkles and promote hair growth, making it a natural fountain of youth.
Are There Any Potential Side Effects or Risks Associated With Using Kombucha for Yeast Infections or Fatty Liver?
There are potential risks and safety concerns associated with using kombucha for yeast infections and fatty liver. Further research is needed to fully understand its impact and determine the extent of its benefits and potential side effects.
Conclusion
In conclusion, kombucha truly lives up to its reputation as a miraculous fountain of health. Its healing powers, from improving digestion and boosting immunity to relieving arthritis pain and promoting skin and hair health, are truly remarkable.
With its natural detoxifying properties and ability to enhance overall well-being, kombucha is a powerhouse of benefits.
So, why not incorporate this incredible elixir into your daily routine and experience the transformative effects for yourself? It’s a health revolution waiting to happen!
Arf, an author and an innovative enthusiast of coffee, coffee alternatives, and tea, plays a crucial role as a contributor to the esteemed Cappuccino Oracle platform. Renowned for his curiosity and passion for these captivating beverages, Arf has carved out a unique space for himself in the world of exploration and writing. He realized that coffee, coffee alternatives, and tea are not mere drinks to keep one awake, but universes of flavors and stories waiting to be explored.
Arf’s articles for Cappuccino Oracle blend meticulous research with personal experiences, providing readers with an in-depth understanding of various types of coffee, coffee alternatives, and tea, along with their unique characteristics, cultures, and histories. His honest reviews and engaging narratives guide readers on their own journeys, helping them discover their preferences and find their perfect brew.

I understand the significance of discovering natural remedies for liver health issues, as I have personally struggled with them. This is why I am thrilled to discuss the advantages of kombucha, a fermented tea that is becoming increasingly popular for its positive effects on liver health.
In this article, we’ll explore kombucha’s impact on fatty liver, gut microbiota in NAFLD, and metabolic alterations. The findings are remarkable – kombucha reduces inflammation and fibrosis, promotes gut microbiota balance, and improves liver metabolism.
Join me as we explore the science behind kombucha’s liver-saving properties.
Key Takeaways
- Kombucha ameliorates liver injury.
- Kombucha reduces lipid accumulation.
- Kombucha increases hepatocyte survival.
- Kombucha decreases inflammation and fibrosis in the liver.
The Impact of Kombucha on Fatty Liver
I have found that consuming kombucha can significantly decrease lipid accumulation in the liver. Research suggests that kombucha plays a vital role in liver disease prevention and has therapeutic potential for liver health.
Studies have shown that kombucha can ameliorate liver injury, reduce lipid accumulation, and increase hepatocyte survival. Furthermore, it decreases inflammation and fibrosis in the liver, which are key factors in liver disease progression.
Kombucha also has a positive impact on gut microbiota in non-alcoholic fatty liver disease (NAFLD), decreasing the abundance of bacteria associated with NAFLD and promoting the growth of beneficial bacteria. Additionally, kombucha’s probiotic properties improve glucose tolerance, reduce hyperinsulinemia, and attenuate liver steatosis.
Overall, incorporating kombucha into a liver-healthy lifestyle may provide numerous benefits, including liver detoxification, protection from oxidative stress and inflammation, and potential prevention and treatment of NAFLD and non-alcoholic steatohepatitis. However, more research is needed to fully understand kombucha’s mechanisms of action.
Kombucha’s Effect on Gut Microbiota in NAFLD
Several studies have demonstrated that kombucha decreases the abundance of bacteria associated with NAFLD, while increasing the growth of beneficial bacteria. This highlights the potential impact of kombucha on gut health and its role in restoring microbial balance.
-
Kombucha’s effect on gut microbiota in NAFLD: Kombucha has been shown to decrease the abundance of bacteria associated with NAFLD, which is beneficial for individuals with this condition. Additionally, it increases the abundance of beneficial bacteria, promoting a healthier gut environment.
-
Kombucha’s role in restoring microbial balance: The ability of kombucha to decrease harmful bacteria while increasing beneficial bacteria suggests its potential in restoring microbial balance in the gut. This is crucial for overall gut health and may have positive implications for individuals with NAFLD.
Considering these findings, incorporating kombucha into a balanced diet and lifestyle may contribute to better gut health and potentially aid in the management of NAFLD. However, more research is needed to fully understand the mechanisms and long-term effects of kombucha on gut microbiota and its impact on NAFLD.
The Effect of Kombucha Probiotic on Metabolic Alterations
Based on the available research, the effect of kombucha probiotic on metabolic alterations shows promising potential in improving glucose tolerance and reducing hyperinsulinemia.
Studies have shown that kombucha can play a significant role in improving insulin sensitivity, which is crucial for managing conditions like diabetes.
Additionally, research has also indicated that kombucha may have a positive effect on liver steatosis, a condition characterized by the accumulation of fat in the liver. Kombucha has been found to attenuate liver steatosis by reducing collagen fiber deposition and enhancing nutrient absorption and liver metabolism.
These findings suggest that incorporating kombucha into a balanced diet and healthy lifestyle may have beneficial effects on metabolic health, particularly in terms of glucose regulation and liver function.
However, further research is needed to fully understand the mechanisms of action and the long-term effects of kombucha on metabolic alterations.
Key Findings on Kombucha’s Effect on Fatty Liver
The key findings on kombucha’s effect on fatty liver show that it ameliorates liver injury, reduces lipid accumulation, increases hepatocyte survival, decreases inflammation in the liver, and decreases fibrosis in the liver.
-
Mechanism of Kombucha’s Action in Fatty Liver:
Research suggests that kombucha’s beneficial effects on fatty liver may be attributed to its ability to improve liver function, reduce oxidative stress, and modulate gut microbiota. The organic acids present in kombucha, such as acetic acid and gluconic acid, have been found to enhance liver detoxification and support overall liver health. -
Potential of Kombucha as a Preventive Measure for NAFLD:
Given its ability to reduce lipid accumulation, inflammation, and fibrosis in the liver, kombucha shows promise as a preventive measure for non-alcoholic fatty liver disease (NAFLD). Incorporating kombucha into a liver-healthy lifestyle, along with proper diet and exercise, may provide numerous benefits and potentially prevent or treat NAFLD.
Further Research and Potential Benefits of Kombucha
I’m excited to explore the potential benefits of kombucha through further research. While there have been promising findings on the impact of kombucha on fatty liver, more understanding is needed on the mechanisms behind its effects.
Clinical trials can provide valuable insights into the specific ways in which kombucha supports liver health. By conducting rigorous studies, we can better understand how kombucha ameliorates liver injury, reduces lipid accumulation, increases hepatocyte survival, decreases inflammation, and reduces fibrosis in the liver.
This knowledge won’t only enhance our understanding of kombucha’s potential benefits for liver health but also guide us in recommending kombucha as a part of a liver-healthy lifestyle.
With further research and clinical trials, we can unlock the full potential of kombucha in preventing and treating conditions like non-alcoholic fatty liver disease and non-alcoholic steatohepatitis.
Incorporating Kombucha Into a Liver-Healthy Lifestyle
By including kombucha in my daily routine, I can improve my liver health and maintain a liver-healthy lifestyle. Here are the reasons why kombucha plays a crucial role in liver detoxification and the potential of kombucha in preventing liver diseases:
-
Detoxification: Kombucha contains organic acids that enhance liver detoxification, aiding in the elimination of toxins from the body.
-
Liver protection: Kombucha’s antioxidant properties protect liver cells from oxidative stress and inflammation, reducing the risk of liver diseases.
-
Anti-inflammatory effects: Regular consumption of kombucha can help decrease inflammation in the liver, preventing conditions like non-alcoholic fatty liver disease (NAFLD).
-
Fibrosis prevention: Kombucha has the potential to prevent liver fibrosis, a common consequence of chronic liver diseases.
Incorporating kombucha into a liver-healthy lifestyle offers numerous benefits, including improved liver function, reduced risk of liver diseases, and overall well-being. However, more research is needed to fully understand kombucha’s mechanisms of action and its specific impact on liver health.
Frequently Asked Questions
Can Kombucha Completely Cure Fatty Liver Disease?
No, kombucha cannot completely cure fatty liver disease. While it may have potential benefits for liver health, there are potential limitations and alternative treatments that should be considered.
What Are the Potential Risks or Side Effects of Consuming Kombucha for Liver Health?
The potential risks or side effects of consuming kombucha for liver health are still being researched. While it may have effectiveness in treating fatty liver disease or non-alcoholic steatohepatitis, it is important to be cautious and consult a healthcare professional.
How Long Does It Take to See the Benefits of Kombucha on Fatty Liver?
It’s hard to say exactly how long it takes to see the benefits of kombucha on fatty liver. Factors like individual health, lifestyle, and dosage may affect effectiveness. Long term effects of kombucha on liver health are still being researched.
Can Kombucha Be Used as a Standalone Treatment for Non-Alcoholic Steatohepatitis?
Kombucha can be a standalone treatment for non-alcoholic steatohepatitis, as it has been shown to reduce liver inflammation. However, its efficacy as a standalone treatment needs further research and understanding.
Are There Any Specific Strains or Types of Kombucha That Are More Effective for Liver Health?
There aren’t any specific strains or types of kombucha that are proven to be more effective for liver health. However, incorporating kombucha into a liver-healthy lifestyle may provide numerous benefits.
Conclusion
In conclusion, kombucha truly is a liver savior. Its remarkable benefits in improving fatty liver, restoring gut microbiota balance, and addressing metabolic alterations make it a natural remedy worth considering for liver health.
The science behind kombucha’s liver-saving properties is backed by evidence, and its potential benefits are promising. By incorporating kombucha into a liver-healthy lifestyle, we can harness its power to support liver function and promote overall well-being.
So raise a glass of kombucha and toast to a healthier liver!
Arf, an author and an innovative enthusiast of coffee, coffee alternatives, and tea, plays a crucial role as a contributor to the esteemed Cappuccino Oracle platform. Renowned for his curiosity and passion for these captivating beverages, Arf has carved out a unique space for himself in the world of exploration and writing. He realized that coffee, coffee alternatives, and tea are not mere drinks to keep one awake, but universes of flavors and stories waiting to be explored.
Arf’s articles for Cappuccino Oracle blend meticulous research with personal experiences, providing readers with an in-depth understanding of various types of coffee, coffee alternatives, and tea, along with their unique characteristics, cultures, and histories. His honest reviews and engaging narratives guide readers on their own journeys, helping them discover their preferences and find their perfect brew.

As someone who is constantly searching for natural remedies and superfoods to improve my overall health, I have come across a powerful ingredient that has piqued my interest: lactobacillus kombucha.
This fermented tea beverage is gaining popularity for its health benefits, especially in promoting gut health, digestion, and reducing inflammation.
Join me as we uncover the potential benefits of lactobacillus kombucha and learn how to unleash its power in our daily routines.
Key Takeaways
- Lactobacillus kombucha is beneficial for improving gut health, digestion, and reducing inflammation.
- It has the potential to prevent chronic diseases like heart disease and cancer.
- Caution should be exercised in homemade preparation to avoid contamination or over-fermentation.
- Incorporating lactobacillus kombucha into the daily routine can lead to experiencing its many potential benefits.
Health Benefits of Lactobacillus Kombucha
I believe that incorporating lactobacillus kombucha into my daily routine can lead to experiencing its many potential health benefits.
Lactobacillus kombucha is a type of probiotic-rich beverage that’s known for promoting gut health and improving digestion.
It has also been found to reduce inflammation in the body, which may have positive effects on overall health.
While more research is needed to fully understand the specific impact of lactobacillus kombucha, it’s important to note that there may be potential side effects.
It’s recommended to consume kombucha in moderation and follow the recommended daily dosage.
This will help ensure that you’re reaping the benefits of lactobacillus kombucha while minimizing any potential risks.
Importance of Research on Lactobacillus Kombucha
Researchers have conducted numerous studies to uncover the potential health benefits of Lactobacillus Kombucha, providing valuable insights into its impact on human well-being.
-
Benefits of lactobacillus kombucha in weight management: Studies suggest that the probiotics in kombucha may aid in weight loss and boost metabolism by improving gut health and digestion.
-
Potential role of lactobacillus kombucha in immune function: Research indicates that the probiotics in kombucha may enhance immune function and reduce inflammation, potentially leading to a strengthened immune system.
These findings highlight the importance of further research on lactobacillus kombucha to fully understand its potential benefits. Continued studies will help determine optimal use and specific impacts on different aspects of human health.
It’s crucial to exercise caution in homemade preparation to avoid contamination or over-fermentation. Additionally, incorporating lactobacillus kombucha into the daily routine can lead to experiencing its many potential benefits, including improved gut health, reduced inflammation, and possibly preventing chronic diseases.
Caution in Homemade Preparation of Lactobacillus Kombucha
One should exercise caution in homemade preparation of lactobacillus kombucha to ensure proper hygiene and minimize the risk of contamination or over-fermentation.
Contamination can occur due to improper handling or unsanitary equipment, leading to the growth of harmful bacteria. Over-fermentation can result in a sour taste and increased alcohol content, which may be undesirable.
To prevent contamination, it’s crucial to maintain cleanliness during the brewing process, including sterilizing utensils and containers. Following recommended guidelines for fermentation time and temperature is also important to avoid over-fermentation. Additionally, using quality ingredients and properly storing the kombucha can help maintain its safety and quality.
Similar Benefits to Green Tea Kombucha
I find it fascinating that incorporating green tea kombucha into my diet can provide additional health benefits similar to green tea. Green tea alternatives are gaining popularity, and kombucha brewing techniques offer a unique way to enjoy these benefits.
- Green tea kombucha is a probiotic-rich beverage that promotes gut health and improves digestion.
- Like green tea, it has anti-inflammatory properties that can reduce inflammation in the body.
- Studies suggest that consuming kombucha may help prevent chronic diseases like heart disease and cancer.
- Additionally, it aids in weight loss and boosts metabolism, making it a great addition to a healthy diet.
- Choosing high-quality green tea kombucha is important to ensure maximum benefits.
Incorporating green tea kombucha into your daily routine can provide a diverse range of beneficial microorganisms in the gut, similar to green tea. It’s a great alternative for those looking to enjoy the health benefits of green tea in a different form.
Incorporating Lactobacillus Kombucha Into the Daily Routine
The daily routine can be enhanced by incorporating lactobacillus kombucha, a probiotic-rich beverage with numerous potential health benefits. Lactobacillus kombucha has been linked to improved gut health, digestion, and reduced inflammation in the body. Additionally, it may have a positive impact on weight loss and metabolism.
Incorporating lactobacillus kombucha into the daily routine can potentially aid in weight management and promote a healthier immune system. To fully understand the impact of lactobacillus kombucha on weight loss and immune health, further research is needed.
It’s important to note that homemade preparation of kombucha should be done with caution to ensure cleanliness and avoid contamination. Overall, incorporating lactobacillus kombucha into the daily routine can contribute to a healthier lifestyle and potentially provide a range of health benefits.
Lactobacillus Kombucha and Gut Health
Research suggests that incorporating lactobacillus kombucha into my daily routine can improve gut health and promote overall well-being. This fermented tea contains beneficial bacteria that can have a positive impact on our immune system and weight management.
Here are some key points to consider:
- Lactobacillus kombucha helps strengthen the immune system by promoting a healthy balance of gut bacteria.
- The probiotics in lactobacillus kombucha can aid in weight management by improving digestion and metabolism.
- Regular consumption of lactobacillus kombucha may reduce inflammation in the body, which is linked to various chronic diseases.
- It’s important to note that homemade kombucha should be prepared with caution to avoid contamination or over-fermentation.
- When choosing lactobacillus kombucha, opt for high-quality options to ensure maximum benefits.
Incorporating lactobacillus kombucha into my daily routine can have a positive impact on my gut health, immune system, and weight management.
Lactobacillus Kombucha and Chronic Disease Prevention
Regular consumption of lactobacillus kombucha has shown potential in preventing chronic diseases such as heart disease and cancer. Studies have indicated that the probiotics present in lactobacillus kombucha can have a positive impact on the immune system, enhancing its ability to fight off infections and diseases.
Additionally, emerging research suggests a potential link between lactobacillus kombucha and mental health. The gut-brain axis, which connects the gut and the brain, is influenced by the gut microbiota. The probiotics in lactobacillus kombucha may help improve the balance of gut bacteria, thereby positively impacting mental health conditions such as anxiety and depression. However, more research is needed to fully understand the mechanisms behind these potential benefits.
Understanding Probiotic Content in Lactobacillus Kombucha
I’m fascinated by the potential benefits of lactobacillus kombucha and I’m eager to understand the variability of its probiotic content. Probiotics, such as lactobacillus strains, play a crucial role in maintaining a healthy gut and overall well-being. When it comes to kombucha, the fermentation process is responsible for the formation of these beneficial microorganisms.
Here are five key points to consider regarding the probiotic content in lactobacillus kombucha:
-
Probiotic Strains: The specific strains of lactobacillus present in kombucha can vary, which may impact their potential health benefits.
-
Fermentation Process: The duration and conditions of the fermentation process can influence the probiotic content in kombucha, leading to variations in the number and types of beneficial bacteria present.
-
Quality Control: Ensuring proper hygiene and following recommended guidelines during the brewing process are essential to maintain the quality and safety of the probiotic-rich kombucha.
-
Labeling Information: Checking the labeling information on commercially available kombucha products can provide insights into the specific probiotic strains present.
-
Scientific Research: Ongoing scientific research is crucial to fully understand the variability of probiotic content in lactobacillus kombucha and its potential impact on human health.
Maximizing the Potential Benefits of Lactobacillus Kombucha
To fully maximize the potential benefits of lactobacillus kombucha, I aim to incorporate it into my daily routine and consume it in adequate amounts. By doing so, I can promote gut health, improve digestion, reduce inflammation, and potentially prevent chronic diseases like heart disease and cancer.
It’s important to note that the fermentation process plays a crucial role in the efficacy of lactobacillus kombucha. Maximizing the fermentation process ensures a higher probiotic content and a more potent drink. However, it’s essential to exercise caution in homemade preparation to avoid contamination or over-fermentation.
While lactobacillus kombucha offers numerous benefits, it’s important to be aware of potential side effects such as bloating or allergic reactions. As with any dietary change, it’s recommended to consult with a healthcare professional before incorporating lactobacillus kombucha into your routine.
Considerations for Choosing High-Quality Lactobacillus Kombucha
When choosing high-quality lactobacillus kombucha, it’s important to consider both the probiotic content and the fermentation process.
-
Choosing reputable brands ensures a reliable source of lactobacillus kombucha.
-
Evaluating the fermentation process guarantees optimal probiotic growth and development.
-
Look for brands that use organic ingredients for a healthier product.
-
Check for transparency in labeling, including information about the specific strains of lactobacillus used.
-
Consider the packaging and storage methods to ensure the kombucha remains fresh and potent.
By considering these factors, one can make an informed decision when selecting lactobacillus kombucha.
It’s crucial to choose reputable brands and evaluate the fermentation process to ensure the highest quality and maximum health benefits.
Taking these steps will enable individuals to harness the power of lactobacillus kombucha and experience its potential advantages for gut health, digestion, and overall well-being.
Frequently Asked Questions
Can Lactobacillus Kombucha Be Harmful if Not Prepared Properly at Home?
If not prepared properly at home, lactobacillus kombucha can have harmful effects due to the fermentation process. It is important to exercise caution and follow recommended guidelines to avoid contamination and ensure safe consumption.
How Does Lactobacillus Kombucha Compare to Other Probiotic-Rich Foods and Beverages?
Lactobacillus kombucha offers unique health benefits when compared to other probiotic-rich foods and beverages. Its ability to improve gut health, digestion, and reduce inflammation sets it apart. Incorporating lactobacillus kombucha into your routine can unleash its potential benefits.
Are There Any Specific Guidelines for Storing and Fermenting Homemade Lactobacillus Kombucha?
Storing and fermenting homemade lactobacillus kombucha? Follow these best practices: maintain proper hygiene and cleanliness, avoid contamination and over-fermentation. Troubleshooting tips: adhere to recommended guidelines, ensure quality and safety through storage and fermentation.
Can Lactobacillus Kombucha Help With Weight Loss and Boosting Metabolism?
Yes, lactobacillus kombucha can potentially help with weight loss and boosting metabolism. Ongoing research suggests that the probiotics in kombucha may have a positive impact on weight management and metabolic function.
What Are the Potential Additional Health Benefits of Incorporating Green Tea Kombucha Into the Diet?
Incorporating green tea kombucha into my diet has the potential to provide additional health benefits. It can offer potential antioxidant benefits and have a positive impact on gut health, improving overall well-being.
Conclusion
In conclusion, unlocking the power of lactobacillus kombucha can truly be a game-changer for our health and well-being. By incorporating this fermented tea into our daily routines, we can experience the benefits of improved gut health, digestion, and reduced inflammation.
With ongoing research, we can continue to uncover its full potential and maximize its benefits. So, let’s raise a glass of lactobacillus kombucha and toast to a healthier and happier life! Cheers to the power of nature’s remedies!

In the vast and diverse world of coffee, coffee alternatives, and tea, Olivia has found her calling. As an author and a dedicated coffee and tea aficionado, her work for Cappuccino Oracle reflects her profound love and understanding of the intricate complexities found within these beverages. Olivia’s passion for the subject serves as both a catalyst for her creativity and a connection point with her audience.
Olivia’s appreciation for coffee, coffee alternatives, and tea blossomed at an early age. She discovered that these beverages invigorated her senses and stimulated her creative spirit. From the nuanced flavors of single-origin roasts to the captivating narratives intertwined with coffee, coffee alternatives, and tea trade and culture, Olivia found an unlimited source of inspiration in her daily cup.
Her love for these beverages and her talent for storytelling eventually converged at Cappuccino Oracle. As an author, Olivia’s mission is to illuminate the intricate tapestry that makes up the world of coffee, coffee alternatives, and tea. Her articles span a diverse range of topics, encompassing everything from the unique flavors of different brews to the sociocultural history intertwined with their cultivation and consumption.

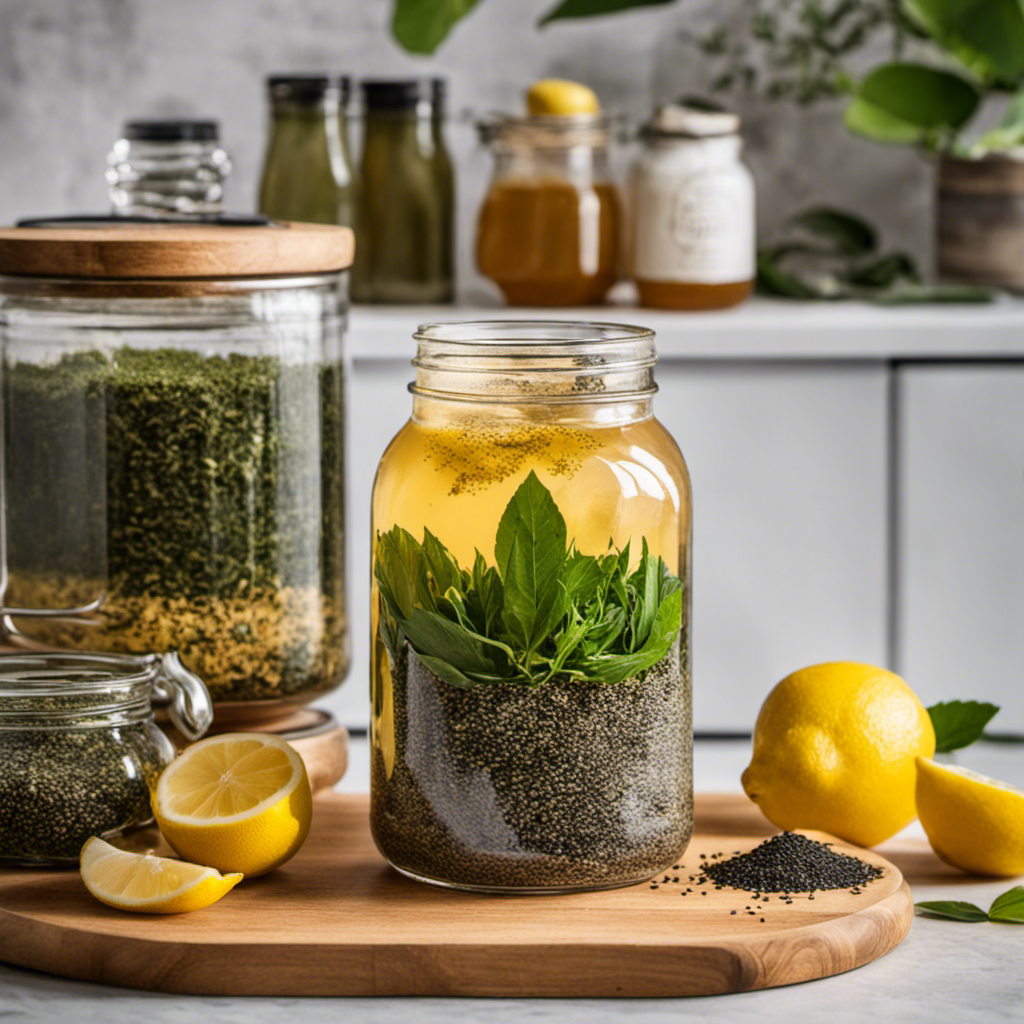
How to Make Kombucha Tea With Chia Seeds

What Type of Tea Is Best for Kombucha

How Much Sugar to 3 Cups of Tea for Kombucha

How Much Caffeine in White Tea Kombucha

How to Make a Scoby With Kombucha Tea Bags

How to Make Americano With Moka Pot

How to Make Korean Iced Americano

How to Make Iced Americano With Instant Coffee

How to Make Americano With Bialetti

How to Make Dutch Bros Americano

Discover the Power of KOS Mushroom Coffee

Top 10 Rated Mushroom Coffee Brands for a Boost

What Makes Caffeine-Free Mushroom Coffee Unique?

Rooibos Tea: A Guide to Safe Breastfeeding Practices

What Mushroom Can I Use as a Coffee Replacement?

-
 Americano4 weeks ago
How to Make Americano With Moka Pot
-
 Americano2 weeks ago
How to Make Korean Iced Americano
-
 Americano4 weeks ago
How to Make Iced Americano With Instant Coffee
-
 Americano4 weeks ago
How to Make Americano With Bialetti
-
 Americano4 weeks ago
How to Make Dutch Bros Americano
-

 Americano6 days ago
How to Make an Iced Americano With Nespresso
-

 Americano2 weeks ago
How Many Shots of Espresso for 16 Oz Americano
-
 Turmeric Tea1 week ago
Turmeric Saffron Tea